BROWSE BY CATEGORY

  • Design
  • Projects
  • Lifestyle
  • Recipes
  • Shop Our Home
  • Home
  • About
  • Work With Us
  • Design Services
  • Contact
  • Design
    • View All Design Posts
    • Decor
    • Design Tips
    • Makeovers
    • Design Plans
    • Shopping Guides
  • Projects
    • View All Project Posts
    • Woodworking
    • DIY
  • Lifestyle
    • View All Lifestyle Posts
    • Entertaining
    • Seasons
      • Spring
      • Summer
      • Fall
      • Winter
    • Holidays
      • Gift Guides
      • Valentine’s Day
      • Easter
      • Thanksgiving
      • Halloween
      • Christmas
    • Recipes
      • View All Recipe Posts
      • Appetizers
      • Drinks
      • Breakfast
      • Dinner
      • Dessert
      • Seasonal
        • Easter Recipes
        • Fall Recipes
        • Halloween Recipes
        • Christmas Recipes
  • Browse by Room
    • Kitchen
    • Dining Room
    • Living Room
    • Bedroom
    • Kids Bedrooms
    • Family and Playroom
    • Office
    • Outdoor Living
  • Shop
    • Shop Our Home
    • Shop Our Cottage
    • Nick’s Workshop

Nick + Alicia

Timeless Design

November 15, 2014 | by Nick

Kitchen Remodel {Part Two}

kitchen remodel
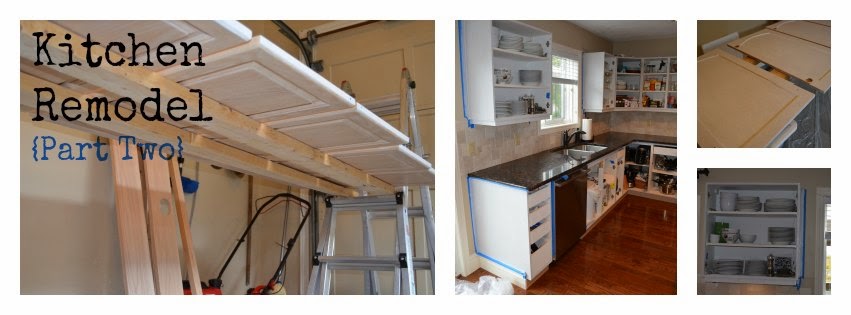
It’s been a while since we posted our first installment of our kitchen reno, things have been very busy around here during the past few months. Today I am finally getting around to Part Two of our kitchen remodel. Do you remember what our kitchen looked like before? No appliances, peach-coloured wood cabinets and absolutely no character.

Priming


I have never been a big fan of painting.  It’s tedious, time consuming, and takes a lot of patience to do it right.  Since the kitchen is the hub of our house I knew I couldn’t rush through it.  From my experience, the key to outstanding results were patience, and the paint products I used.  I went to our local Benjamin Moore retailer and asked for their advice.  They had recommended I apply a base using a product called STIX Waterborne BondingPrimer.  This product adhered very well to all of the surfaces including the laminate ends of the cabinets.
 
For the primer coat I used a standard mini foam roller and paint brush.  I found the ideal method was to hold the door up in one hand to coat all of the edges first, and then lay it back down on the 2 x 4’s and coat the rest of the surface.  I made sure not to put the primer on too heavily to avoid any drips (make sure you avoid painting where you numbered the cabinets).  You only need a thin coat to create a bondable surface.  Once you’ve done all of the back sides of the cabinets (including the backs of the drawer fronts) wait until they are dry as per the instructions on the can and then flip to do the front sides.  If you notice that any drip marks have made their way over to the front, now is the time to sand them off.  Also do your priming coat on the cabinet boxes.
 
I left my primed doors and cabinets to fully cure for a full 7 days, although you could probably get away with just 3.

Painting

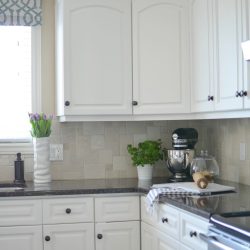
For the finishing coat I used Benjamin Moore Advanced (Pearl Finish) in Mountain Peak White.  This stuff is amazing
for furniture and cabinets.  It goes on smooth and then self-levels to a perfect finish with no brush marks.  Use small mohair rollers and a decent quality brush for this.  I put on very light coats, so in total I had 3 on the back and 4 on the front, and to tell you the truth, I probably could have done one more on the front.  Also apply 3 or 4 coats to your cabinet boxes.
 
We had real wood cabinet doors so even after we painted them, the natural grain still showed through which made them look richer.  As much as we would all like to minimize how many coats of paint we apply, it was worth the extra effort for these results.  This paint also dries very hard after about a week and is difficult to chip!
 
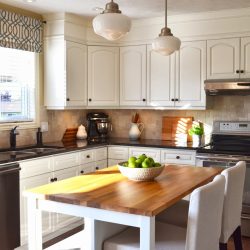
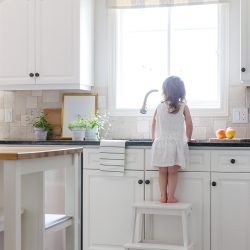
When you’ve finished all of your doors, you can easily put them back in place by matching up the numbered doors with the numbered cabinets (Part One) and re-attach your knobs and pulls.And now it look’s like this…


YOU MAY ALSO LIKE...

  • Kitchen Tour
  • Kitchen Remodel {Part One}
  • A sleek new pull-down faucet adds a touch of modern simplicity to this white modern farmhouse kitchen.
    Easy Kitchen Upgrade | Our New Kitchen Faucet

Comments

  1. DDR Kitchen Remodeling says

    January 18, 2016 at 3:04 am

    Both given after kitchen remodel project photos and the post worth a comment. You don’t always see a kitchen with that much of space and finishing. Heading for the part 01 🙂

    Reply
  2. kitchen remodeling cleveland says

    January 21, 2018 at 1:00 pm

    great site

    Reply

Leave a Reply Cancel reply

Your email address will not be published. Required fields are marked *

Sweeping away the cobwebs to make room for summer Sweeping away the cobwebs to make room for summer adventures! ☀️#playhouse #playhouserefresh #springcleaning #interiordesign #interiordesigner #cottagecorehome #modernvintage
Vintage art prints: my secret to infusing charm, c Vintage art prints: my secret to infusing charm, character, and nostalgia into any space.While remodelling our family cottage, I incorporated a handful of beautiful pieces of coastal art into each room to evoke the timeless charm and character of days gone by.Head to nickandalicia.com today for a peek into my process of selecting, printing, and framing the perfect vintage coastal art prints, along with links to my fave pieces!
Our homes are so much more than just walls and roo Our homes are so much more than just walls and roofs—they’re where some of life’s best moments unfold.Do you have a favourite memory in your home?#modernhome #interiorinspiration #collectedhome #modernvintage #vintagestyle #transitionaldesign#smmakelifebeautiful
This is the drink of the summer! 🍹 With just fo This is the drink of the summer! 🍹 With just four simple ingredients, our lychee, guava, and elderberry cocktail is easy to make and oh-so-delicious. Save this recipe for your go-to summer drink!Lychee, Guava & Elderberry CocktailIngredients •1.5 oz St Germain liqueur •1/3 glass guava juice •1/3 glass lychee juice •Lemon-flavoured sparkling water: Top off glass •Fresh lemon juice: Squeeze from lemon wedge •Lemon zest: A pinch for garnish •Thyme sprigs: For garnishInstructions 1. Mix Ingredients: In a glass, combine 1/3 of the glass with lychee juice and 1/3 of the glass with guava juice. Add 1.5 oz of St Germain Liqueur.2. Add Sparkling Water: Top off the glass with lemon-flavored sparkling water.3. Add Lemon Juice: Squeeze in fresh lemon juice from one lemon wedge and stir everything gently to mix.4. Garnish: Garnish the drink with a pinch of lemon zest and a sprig of thyme for a fragrant touch.5. Serve and Enjoy: Your lychee, guava, and elderberry cocktail is ready to be served. Enjoy this refreshing summer drink!Will you be giving it a try this summer?
Obsessed with this versatile shade of green, it’ Obsessed with this versatile shade of green, it’s perfect for walls, trim, or cabinetry!Looking for more? Check out our all-time favourite green paint colours at nickandalicia.com today!#paint #greenpaint #kitchen #kitchenisland #kitchencabinets #classicdesign #traditionalcharm #vintagevibes
You’re tired of waiting on your dream home, so y You’re tired of waiting on your dream home, so you decide to make your house the dreamiest it can be. Who’s with me? 🙋🏻‍♀️#kitchen #kitchendecor #modernhome #interiorinspiration #homedesign #collectedhome #transitionaldesign #traditionalcharm
April Recap: thrift finds, spring vibes, and our f April Recap: thrift finds, spring vibes, and our first trip to the cottage! Catch up on our favourite moments of the month at nickandalicia.com.

Join our Newsletter

Copyright ©2025 Nick + Alicia
  • Contact
  • POLICIES + DISCLOSURE