BROWSE BY CATEGORY

  • Design
  • Projects
  • Lifestyle
  • Recipes
  • Shop Our Home
  • Home
  • About
  • Work With Us
  • Design Services
  • Contact
  • Design
    • View All Design Posts
    • Decor
    • Design Tips
    • Makeovers
    • Design Plans
    • Shopping Guides
  • Projects
    • View All Project Posts
    • Woodworking
    • DIY
  • Lifestyle
    • View All Lifestyle Posts
    • Entertaining
    • Seasons
      • Spring
      • Summer
      • Fall
      • Winter
    • Holidays
      • Gift Guides
      • Valentine’s Day
      • Easter
      • Thanksgiving
      • Halloween
      • Christmas
    • Recipes
      • View All Recipe Posts
      • Appetizers
      • Drinks
      • Breakfast
      • Dinner
      • Dessert
      • Seasonal
        • Easter Recipes
        • Fall Recipes
        • Halloween Recipes
        • Christmas Recipes
  • Browse by Room
    • Kitchen
    • Dining Room
    • Living Room
    • Bedroom
    • Kids Bedrooms
    • Family and Playroom
    • Office
    • Outdoor Living
  • Shop
    • Shop Our Home
    • Shop Our Cottage
    • Nick’s Workshop

Nick + Alicia

Timeless Design

January 4, 2015 | by Alicia

DIY Book Wreath

DIY Book Wreath

My mom works at a library, so I grew up surrounded by books and a love of reading. It’s no wonder I love having books scattered throughout our home as well. A stack of vintage books adds instant character to a room, I’m always layering them onto our bookshelves, or stacking them on tabletops.

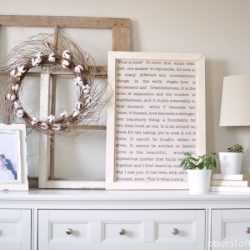
So, it goes without saying that I’ve always loved book wreaths. I had just never got around to making one for our home. I was always seeing such beautiful variations of them on other bloggers home tours, so this Christmas I decided now was the time! I originally made mine as part of my Christmas decor this year, however, I love it so much I think I’ll leave it up all year!

I can’t believe I waited so long before making one. It was so easy (although a little bit time consuming – it took me about two hours to complete). But I’m so happy with the way it turned out.

DIY Book Wreath

Materials:

  • Foam floral wreath (I got mine here)
  • Book
  • Hot glue gun
  • Black or brown ink pad

Instructions:

  1. To give the book a more antique look, I blotted all three sides with a black ink pad.
  2. Starting at the outer edge of the foam wreath, begin gluing the pages in place. The technique I used was pinching the centre of the page and slightly crinkling it to give it some fullness.
  3. Start at the outer edge of the wreath and circle your way in. I did three layers before I reached the inner edge of the wreath.
  4. Once you’ve covered the entire wreath, you may need to fill in a few missing gaps so there are no spaces with the foam wreath showing through.

DIY Book Wreath

YOU MAY ALSO LIKE...

  • DIY Fall Cotton Wreath
  • DIY Snow Globe
  • Neutral Fall Wreath

Leave a Reply Cancel reply

Your email address will not be published. Required fields are marked *

Sweeping away the cobwebs to make room for summer Sweeping away the cobwebs to make room for summer adventures! ☀️#playhouse #playhouserefresh #springcleaning #interiordesign #interiordesigner #cottagecorehome #modernvintage
Vintage art prints: my secret to infusing charm, c Vintage art prints: my secret to infusing charm, character, and nostalgia into any space.While remodelling our family cottage, I incorporated a handful of beautiful pieces of coastal art into each room to evoke the timeless charm and character of days gone by.Head to nickandalicia.com today for a peek into my process of selecting, printing, and framing the perfect vintage coastal art prints, along with links to my fave pieces!
Our homes are so much more than just walls and roo Our homes are so much more than just walls and roofs—they’re where some of life’s best moments unfold.Do you have a favourite memory in your home?#modernhome #interiorinspiration #collectedhome #modernvintage #vintagestyle #transitionaldesign#smmakelifebeautiful
This is the drink of the summer! 🍹 With just fo This is the drink of the summer! 🍹 With just four simple ingredients, our lychee, guava, and elderberry cocktail is easy to make and oh-so-delicious. Save this recipe for your go-to summer drink!Lychee, Guava & Elderberry CocktailIngredients •1.5 oz St Germain liqueur •1/3 glass guava juice •1/3 glass lychee juice •Lemon-flavoured sparkling water: Top off glass •Fresh lemon juice: Squeeze from lemon wedge •Lemon zest: A pinch for garnish •Thyme sprigs: For garnishInstructions 1. Mix Ingredients: In a glass, combine 1/3 of the glass with lychee juice and 1/3 of the glass with guava juice. Add 1.5 oz of St Germain Liqueur.2. Add Sparkling Water: Top off the glass with lemon-flavored sparkling water.3. Add Lemon Juice: Squeeze in fresh lemon juice from one lemon wedge and stir everything gently to mix.4. Garnish: Garnish the drink with a pinch of lemon zest and a sprig of thyme for a fragrant touch.5. Serve and Enjoy: Your lychee, guava, and elderberry cocktail is ready to be served. Enjoy this refreshing summer drink!Will you be giving it a try this summer?
Obsessed with this versatile shade of green, it’ Obsessed with this versatile shade of green, it’s perfect for walls, trim, or cabinetry!Looking for more? Check out our all-time favourite green paint colours at nickandalicia.com today!#paint #greenpaint #kitchen #kitchenisland #kitchencabinets #classicdesign #traditionalcharm #vintagevibes
You’re tired of waiting on your dream home, so y You’re tired of waiting on your dream home, so you decide to make your house the dreamiest it can be. Who’s with me? 🙋🏻‍♀️#kitchen #kitchendecor #modernhome #interiorinspiration #homedesign #collectedhome #transitionaldesign #traditionalcharm
April Recap: thrift finds, spring vibes, and our f April Recap: thrift finds, spring vibes, and our first trip to the cottage! Catch up on our favourite moments of the month at nickandalicia.com.

Join our Newsletter

Copyright ©2025 Nick + Alicia
  • Contact
  • POLICIES + DISCLOSURE