BROWSE BY CATEGORY

  • Design
  • Projects
  • Lifestyle
  • Recipes
  • Shop Our Home
  • Home
  • About
  • Work With Us
  • Design Services
  • Contact
  • Design
    • View All Design Posts
    • Decor
    • Design Tips
    • Makeovers
    • Design Plans
    • Shopping Guides
  • Projects
    • View All Project Posts
    • Woodworking
    • DIY
  • Lifestyle
    • View All Lifestyle Posts
    • Entertaining
    • Seasons
      • Spring
      • Summer
      • Fall
      • Winter
    • Holidays
      • Gift Guides
      • Valentine’s Day
      • Easter
      • Thanksgiving
      • Halloween
      • Christmas
    • Recipes
      • View All Recipe Posts
      • Appetizers
      • Drinks
      • Breakfast
      • Dinner
      • Dessert
      • Seasonal
        • Easter Recipes
        • Fall Recipes
        • Halloween Recipes
        • Christmas Recipes
  • Browse by Room
    • Kitchen
    • Dining Room
    • Living Room
    • Bedroom
    • Kids Bedrooms
    • Family and Playroom
    • Office
    • Outdoor Living
  • Shop
    • Shop Our Home
    • Shop Our Cottage
    • Nick’s Workshop

Nick + Alicia

Timeless Design

January 11, 2015 | by Alicia

DIY Rustic Chalkboard

DIY Rustic Chalkboard

Happy Sunday everyone! We’ve been busy around here getting organized and finishing off last minute projects before Baby G arrives. Today I’m sharing one of those projects!

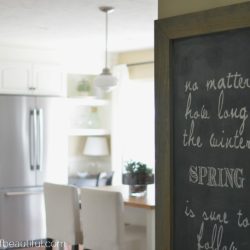
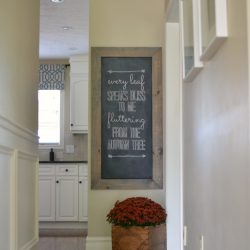
I’d been hinting (not very subtly) for a while that I really wanted a rustic-looking chalkboard for our dining room. So just before Christmas Nick built me this gorgeous chalkboard one afternoon. It’s simple and rustic, and just perfect for our dining room.

I have yet to practice my chalkboard writing skills, but once I do, I’ll be sure to post my tips and tricks that I learn along the way. I haven’t just had a blank chalkboard sitting in my dining room either, over the holidays I used it as a backdrop for our Christmas countdown.  But now that Christmas has come and gone I need to get creative and use it (because now it’s just sitting in our dining room begging for some attention!).

DIY Rustic Chalkboard

SHOPPING LIST:

  • 1 – 24″ x 48″ particle board
  • 2 – 1″ x 4″ x 8′ pine boards
  • Rust Oleum Specialty Chalkboard Paint
  • Minwax Classic Gray 271 (or any colour)

STEPS:

  1. Cut each of the 1″ x 4″ x 8′ boards into the following lengths with 45°angles on each end using a miter saw.  Keep in mind the outside corners of the boards are the measurements, not the inside corners (see diagram above) – Board 1 – 50″ & 25, Board 2 – 50″ & 25″
  2. Stain these pieces with a stain of your choosing using a foam brush or paper towels.  Wipe off the excess stain and let it fully dry.  You can apply a coat of polyurethane, but it is not necessary since the frame will not be coming into contact with any water.
  3. Using a small foam roller, coat the 24″ x 48″ particle board.  You will require 2 or 3 coats to ensure good coverage.  Allow it to dry completely between each coat.
  4. Lay the 4 pieces of the frame out on the floor with the stained side facing down, making sure that each corner is square.
  5. Place the 24″ x 48″ board on top with the chalk side facing down, keeping it centered on all sides.
  6. Using a nail gun and compressor, attach the board to the frame pieces using 3/4″ finishing nails.
  7. Sand down all edges using a 120 grit sandpaper.  Feel free to distress the piece using a hammer and any other objects that will create some rustic looking marks.
  8. Condition the chalkboard by placing a piece of white chalk on its side and coat the entire board.  Wipe off with a chalkboard brush.

DIY Rustic Chalkboard


YOU MAY ALSO LIKE...

  • DIY Perfect Chalkboard Lettering
  • Fall Chalkboard Art
  • DIY Rustic Candle Tray

Leave a Reply Cancel reply

Your email address will not be published. Required fields are marked *

Sweeping away the cobwebs to make room for summer Sweeping away the cobwebs to make room for summer adventures! ☀️#playhouse #playhouserefresh #springcleaning #interiordesign #interiordesigner #cottagecorehome #modernvintage
Vintage art prints: my secret to infusing charm, c Vintage art prints: my secret to infusing charm, character, and nostalgia into any space.While remodelling our family cottage, I incorporated a handful of beautiful pieces of coastal art into each room to evoke the timeless charm and character of days gone by.Head to nickandalicia.com today for a peek into my process of selecting, printing, and framing the perfect vintage coastal art prints, along with links to my fave pieces!
Our homes are so much more than just walls and roo Our homes are so much more than just walls and roofs—they’re where some of life’s best moments unfold.Do you have a favourite memory in your home?#modernhome #interiorinspiration #collectedhome #modernvintage #vintagestyle #transitionaldesign#smmakelifebeautiful
This is the drink of the summer! 🍹 With just fo This is the drink of the summer! 🍹 With just four simple ingredients, our lychee, guava, and elderberry cocktail is easy to make and oh-so-delicious. Save this recipe for your go-to summer drink!Lychee, Guava & Elderberry CocktailIngredients •1.5 oz St Germain liqueur •1/3 glass guava juice •1/3 glass lychee juice •Lemon-flavoured sparkling water: Top off glass •Fresh lemon juice: Squeeze from lemon wedge •Lemon zest: A pinch for garnish •Thyme sprigs: For garnishInstructions 1. Mix Ingredients: In a glass, combine 1/3 of the glass with lychee juice and 1/3 of the glass with guava juice. Add 1.5 oz of St Germain Liqueur.2. Add Sparkling Water: Top off the glass with lemon-flavored sparkling water.3. Add Lemon Juice: Squeeze in fresh lemon juice from one lemon wedge and stir everything gently to mix.4. Garnish: Garnish the drink with a pinch of lemon zest and a sprig of thyme for a fragrant touch.5. Serve and Enjoy: Your lychee, guava, and elderberry cocktail is ready to be served. Enjoy this refreshing summer drink!Will you be giving it a try this summer?
Obsessed with this versatile shade of green, it’ Obsessed with this versatile shade of green, it’s perfect for walls, trim, or cabinetry!Looking for more? Check out our all-time favourite green paint colours at nickandalicia.com today!#paint #greenpaint #kitchen #kitchenisland #kitchencabinets #classicdesign #traditionalcharm #vintagevibes
You’re tired of waiting on your dream home, so y You’re tired of waiting on your dream home, so you decide to make your house the dreamiest it can be. Who’s with me? 🙋🏻‍♀️#kitchen #kitchendecor #modernhome #interiorinspiration #homedesign #collectedhome #transitionaldesign #traditionalcharm
April Recap: thrift finds, spring vibes, and our f April Recap: thrift finds, spring vibes, and our first trip to the cottage! Catch up on our favourite moments of the month at nickandalicia.com.

Join our Newsletter

Copyright ©2025 Nick + Alicia
  • Contact
  • POLICIES + DISCLOSURE