• Blog
  • About
  • Shop Our Instagram
  • Weekly Newsletter
  • Contact
  • HOUSE + HOME
    • All House + Home
    • Mudroom
    • Kitchen
    • Dining Room
    • Living Room
    • Bedroom
    • Kids Bedrooms
    • Family and Playroom
    • Office
    • Outdoor Living
    • Woodworking
  • LIFE + STYLE
    • All Life + Style
    • Entertaining
    • Holidays
  • FOOD + DRINK
    • All Food + Drink
    • Appetizers
    • Drinks
    • Breakfast
    • Dinner
    • Dessert
  • Shop
    • Our Home
    • Window Shades
    • Paint Colors
    • Nick’s Workshop

Nick + Alicia

Lifestyle

April 27, 2015 | by Nick

DIY Rustic Industrial Shelf

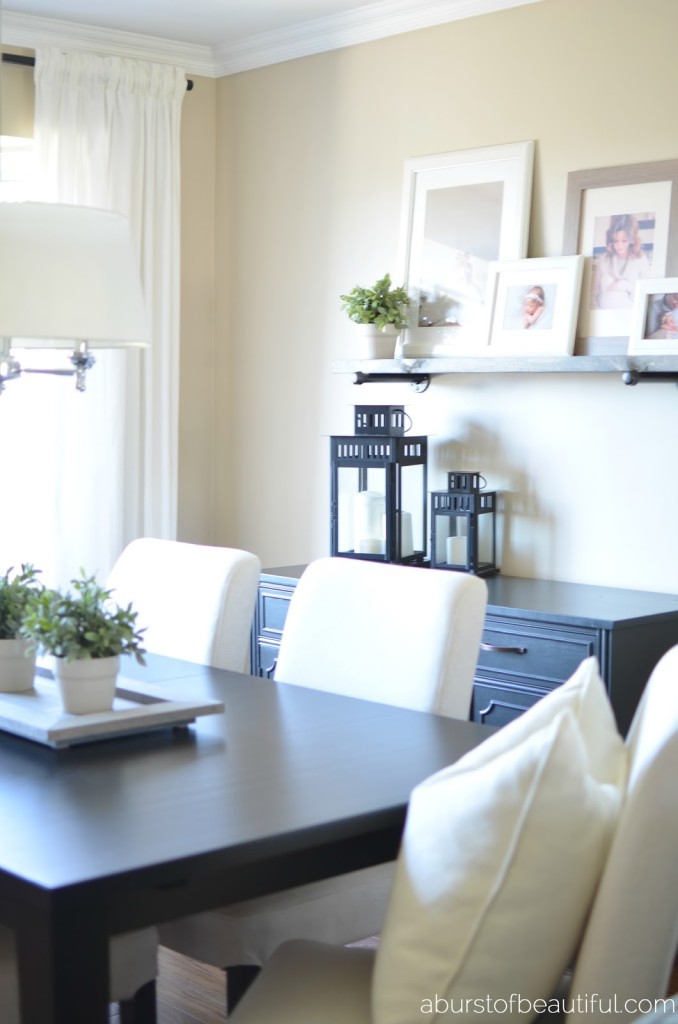
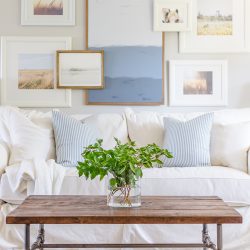
Since we moved into our home three years ago my wife has been styling the buffet in our dining room but she could never get it quite right. We needed something to fill the space above the sideboard to help make the room feel more inviting and not as stark. Because our dining room and living room are open concept and flow into one another, we wanted to make sure whatever we decided on wouldn’t compete with the open shelving we have in the living room and make the space look too busy.

DIY Rustic Industrial Shelf

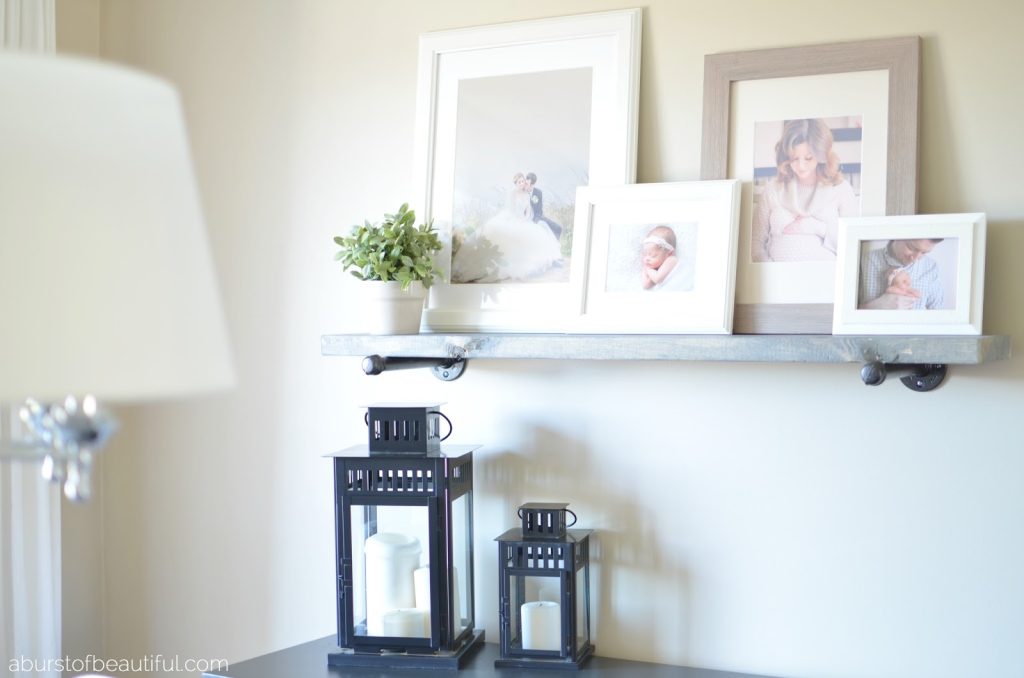
We have a passion for photography and love displaying family photos, so she finally decided that a picture ledge would be the perfect addition. We agreed we wanted it to be a little bit rustic and unique. We decided it would be fun to make an industrial pipe picture ledge, which ties in perfectly with our DIY industrial coffee table in our living room.

DIY Rustic Industrial Shelf


These directions are for a 4′ – 5′ shelf. If you are making a wider shelf please add additional supports. If you plan on putting heavy items such as dishes or glasses on the shelf I would also recommend adding more supports or ensuring they are screwed into studs no more than 32″ apart.

Shopping List:

  • 2 – 8″ x 3/4″ Galvanized Pipes (you may need to have these cut at Home Depot)
  • 2 – 3/4″ Galvanized Pipe Caps
  • 2 – 3/4″ Galvanized Floor Flanges
  • 1 – 2″ x 8″ x 8′ piece of pine or spruce (Home Depot will cut this down to length for you for free)
  • Wall anchors and screws that will hold up to 75 lbs
  • Antique Bronze Spray Paint or colour of your choice
  • Classic Grey Minwax Stain or colour of your choice
  • Foam Applicator Brush

Instructions:

  1. Assemble a pipe cap to one end of the 8″ pipe, and a floor flange to the other. Repeat this for the second shelf support.
  2. Spray paint with Antique Bronze or any colour you choose in a well-ventilated area. Allow to dry.
  3. Apply stain using foam applicator brush to your piece of pine or spruce. Wipe off excess and let dry.
  4. Using a stud finder find the closest stud locations. If you can anchor these to studs it will make it much more sturdy.
  5. Mark location on the wall where you would like your supports using a pencil to mark each of the hole locations. Use a level or laser level to make sure you are placing them both at the right height. If anchoring to a stud make sure at least two of the holes are lined up with it.
  6. Use wall anchors for the other screw holes that will not go into a stud.
  7. Secure shelf supports and wood shelf will rest on top of them.
DIY Rustic Industrial Shelf
 
*Disclaimer – under no circumstances do these instructions guarantee support of all items you may place on this shelf.  Please use your own judgment.
 
Sharing at: Thoughts from Alice, City Farmhouse, Just a Girl and her Blog, AKA Designs

YOU MAY ALSO LIKE...

  • DIY Rustic Wood Joy Sign
  • Learn how to build this easy and inexpensive rustic industrial pipe coffee table
    Industrial Pipe Coffee Table | Free Plans
  • Learn how to build this rustic industrial pipe table with this simple tutorial | A Burst of Beautiful
    DIY Rustic Industrial Pipe Table

Comments

  1. Nikki Frank-Hamilton says

    April 29, 2015 at 7:10 pm

    I love this. The pipe against the rustic wood with the modern pictures. Just perfect in my book. Absolutely perfect. I have the same lantern, don't be surprised if I have a shelf like this on the blog in the future. I love it!

    Reply
    • Alicia says

      April 30, 2015 at 7:52 am

      Nikki I'm so glad you love this project as much as we do. It's such an easy DIY. Have fun making your own!

      Reply
  2. HalfMarathonTrainingTips says

    November 3, 2015 at 6:40 am

    great post

    Reply
    • Alicia says

      November 11, 2015 at 1:03 am

      Thank you!

      Reply
  3. Alicia says

    January 31, 2016 at 10:22 am

    Alicia, I am in love with your home! It is beautiful!!! So much inspiration.

    PS- I love your name 😉

    Blessings,
    Alicia xo

    Reply
    • Alicia says

      February 1, 2016 at 2:03 pm

      Thank you so much for your kind words Alicia! xo

      Reply

Leave a Reply Cancel reply

Your email address will not be published. Required fields are marked *

A place to find design inspiration, entertaining ideas and simple recipes. Take a few minutes to learn more about us, shop our favourite things and sign up for our weekly newsletter.

JOIN OUR NEWSLETTER

I am so glad we added miniature trees to the girls I am so glad we added miniature trees to the girls' bedrooms this year. They absolutely loved having their very own tree to decorate with their collection of ornaments and handmade treasures.It was a simple and inexpensive way to add an extra dose of holiday magic to their rooms, after all, there is nothing better than witnessing Christmas through the eyes of a child. They truly find such beauty and magic in even the smallest of details. 🎄
This view looks a little bit different this year a This view looks a little bit different this year as we're in the middle of our kitchen renovation. See that little half-wall with the hats, well we've removed it so that we see right into the kitchen now and it's amazing! We've been making great progress, just yesterday our new sink, faucet, and counters were all installed. It's all of these little changes that are making such a big difference. We'll have a few more details to take care of after the holidays, but we're really looking forward to crossing the finish line and sharing it all with you!
I wish our dining looked this tidy at the moment! I wish our dining looked this tidy at the moment! It’s currently under a pile of toys and kitchen essentials. If you’ve been following along with our behind the scenes account, @nick.and.alicia.bts, you’ll know we’re making some big progress on the kitchen. Early next week our window and countertop will be installed, so Nick’s been busy removing our existing counters and sink. It’s so exciting to see it all come together and I’ll be happy to have running water again next week!
Most of our snow has melted, but I'm hopeful we wi Most of our snow has melted, but I'm hopeful we will have a white Christmas this year! I just think everything is a bit more magical when covered in a blanket of fresh snow. ❄⁣ ⁣ Are you team snow or no?
Earlier this week we shared our holiday home tour, Earlier this week we shared our holiday home tour, and now we’re giving you a closer look at the girls’ bedrooms, along with a few helpful tips for decorating kids’ spaces for the holiday season.Do you decorate your little ones’ bedrooms for Christmas?
This year I took my time while decorating our home This year I took my time while decorating our home for the holidays and focused on incorporating simple touches that bring us joy and evoke the spirit of Christmas. Our home feels cozy and inviting, and the girls are loving every minute of the holiday season. 🎅🏼Stop by our blog, nickandalicia.com, to see our holiday home tour, along with new tours added every day this week! Tap to see who joined us yesterday.
Sometimes all it takes is a bow to add a festive t Sometimes all it takes is a bow to add a festive touch for the holiday season! 💙

Join our Newsletter

Copyright ©2021 Nick + Alicia
  • Contact
  • POLICIES + DISCLOSURE