• Blog
  • About
  • Shop Our Instagram
  • Contact
  • HOUSE + HOME
    • All House + Home
    • Mudroom
    • Kitchen
    • Dining Room
    • Living Room
    • Bedroom
    • Kids Bedrooms
    • Family and Playroom
    • Office
    • Outdoor Living
    • Woodworking
  • LIFE + STYLE
    • All Life + Style
    • Entertaining
    • Holidays
  • FOOD + DRINK
    • All Food + Drink
    • Appetizers
    • Drinks
    • Breakfast
    • Dinner
    • Dessert
  • Shop
    • Christmas Shop
    • Our Home
    • Zoe’s Favourites
    • Ella’s Favourites
    • Alicia’s Favourites
    • Nick’s Favourites
    • Window Shades
    • Paint Colors
    • Nick’s Workshop

Nick + Alicia

Lifestyle

May 26, 2015 | by Alicia

DIY Perfect Chalkboard Lettering

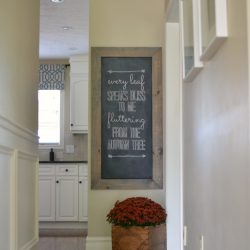
Do you ever feel overwhelmed at starting (or finishing) a project? No matter how big or small it might be? That’s how I felt about my DIY rustic chalkboard.

DIY Perfect Chalkboard Lettering

I had bugged my husband for weeks to make me this beautiful chalkboard and after he did it sat in our home completely blank for days and then weeks before I got up the nerve to try my hand at chalk lettering.

DIY Perfect Chalkboard Lettering

It looked so beautiful and perfect that I didn’t want to mess it up with sloppy handwriting. I was completely overwhelmed. I kept seeing chalkboards on Pinterest with beautifully hand-written lettering and I no idea where to start. A lot of the tutorials I read were overwhelming and time-consuming. They consisted of measurements, grids and fancy chalk pens. I wanted something easy!

DIY Perfect Chalkboard Lettering

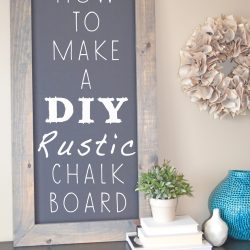
I discovered this super easy method that will give you beautiful chalk lettering every time.

DIY Perfect Chalkboard Lettering

 Supplies:

  • Chalk
  • Paper
  • Pen

Instructions:

Using a program like Word, Photoshop or even PicMonkey, type your quote or message. Depending on the size of your chalkboard you may have to print each word on a single page.

DIY Perfect Chalkboard Lettering

Rub a piece of chalk (using the long edge) on the back of each sheet of paper.

Place the sheet of paper on the chalkboard with the printed word facing out (you may want to tape it in place to keep it from moving).

DIY Perfect Chalkboard Lettering

Using a pen (with the lid on) and pressing firmly, trace the outline of the word onto the chalkboard. Carefully remove the piece of paper and you will have the faint outline of the word in chalk.

DIY Perfect Chalkboard Lettering

Finally, using your chalk trace over the outline of the word to complete your quote. I like to use scissors to sharpen the end of my chalk into a point to give me more accuracy when writing.

It’s as easy as that! No measuring, no grid lines to erase afterwards. Just plain and simple chalk lettering.

DIY Perfect Chalkboard Lettering

Let me know if you have any other tips for chalk lettering in the comments below.

Sharing at: Craftberry Bush, Finding Silver Pennies

YOU MAY ALSO LIKE...

  • DIY Rustic Candle Tray
  • DIY Rustic Chalkboard
  • Fall Chalkboard Art

Leave a Reply Cancel reply

Your email address will not be published. Required fields are marked *

A place to find design inspiration, entertaining ideas and simple recipes. Take a few minutes to learn more about us, shop our favourite things and sign up for our weekly newsletter.

JOIN OUR NEWSLETTER

Instagram post 2194028569148024202_1339909674 Home sweet home! We didn't go far, but today was a busy day and it felt so good to come back to this cozy house of ours. Even if it's just for a few hours before we head back out the door again!
Instagram post 2193304093586600082_1339909674 Tis the season for holiday parties! How many will you be attending this year? I think we've got 3 on our calendar. ⁣ ⁣ If you want to see more of this table I set, just search "holiday table" on our blog, nickandalicia.com.
Instagram post 2192579153153286234_1339909674 A vase filled with seeded eucalyptus is an easy and inexpensive holiday centerpiece. And the best part is it still looks beautiful once it's dried.
Instagram post 2191854838659523503_1339909674 Did you catch the video of me in Nick's shop this week? Well, we partnered with our friends @kregjig to show you how to build a gift wrapping caddy just in time for the holidays.And guess what? I built it entirely on my own! It was my first time using power tools, but with Nick's guidance I was able to build this entire project from start to finish.Right now, @kregjig is offering $15 rebates on the K4, K4MS, K5 and K5MS from now until January 31st. If you've got a woodworker or a DIY'er in your life these would make a great gift.
Instagram post 2191129557617191662_1339909674 Garland isn't just for banisters. I love draping it over windows and doorways too. We added just a few simple holiday touches to our kitchen, and I love how magical it feels now. You can catch our Christmas home tour on the blog, it's live right now! ⁣ ⁣ And every day this week an amazing group of bloggers will be sharing their homes too, for a total of 50 incredible Christmas home tours. So grab a cup of coffee and get cozy! ☕
Instagram post 2190404680560096371_1339909674 Grab a cup of coffee and get cozy because today we're taking you on a tour of our home all dressed up for the holidays. We're sharing a few simple ideas for decorating your own home for Christmas, along with a few colourful and sweet details we added for our girls this year. 💜💗💙
Instagram post 2189679919643049437_1339909674 Who else is starting their holiday baking? 🙋🏻‍♀️⁣ ⁣ You can find the recipe for these melt-in-your-mouth shortbread cookies on our blog, nickandalicia.com, just search "shortbread". Happy baking!

Join our Newsletter

Copyright ©2019 Nick + Alicia
  • Contact
  • POLICIES + DISCLOSURE