• Blog
  • About
  • Shop Our Instagram
  • Weekly Newsletter
  • Contact
  • HOUSE + HOME
    • All House + Home
    • Mudroom
    • Kitchen
    • Dining Room
    • Living Room
    • Bedroom
    • Kids Bedrooms
    • Family and Playroom
    • Office
    • Outdoor Living
    • Woodworking
  • LIFE + STYLE
    • All Life + Style
    • Entertaining
    • Holidays
  • FOOD + DRINK
    • All Food + Drink
    • Appetizers
    • Drinks
    • Breakfast
    • Dinner
    • Dessert
  • Shop
    • Our Home
    • Window Shades
    • Paint Colors
    • Nick’s Workshop

Nick + Alicia

Lifestyle

May 12, 2015 | by Alicia

DIY Pom Pom Mobile

While I was planning for our baby’s arrival and decorating her nursery I fell in love with an adorable pom pom mobile from The Cross.  It was exactly what I was looking for to complete our nursery. It was soft and soothing and just plain cute.

A DIY pom-pom mobile made from yarn and an embroidery hoop is a fun and stimulating addition to your little one's nursery. Find the full tutorial at www.aburstofbeautiful.com | A Burst of Beautiful

Last Christmas I saw so many great pom pom tutorials. They were everywhere…garlands, blankets and stockings. I had really wanted to try making my own DIY pom pom garland, but was just never able to find the time amidst all of the holiday craziness. So I knew a DIY pom pom mobile was the perfect project for me now.

A DIY pom-pom mobile made from yarn and an embroidery hoop is a fun and stimulating addition to your little one's nursery. Find the full tutorial at www.aburstofbeautiful.com | A Burst of Beautiful

DIY Pom Pom Mobile

Materials:

  • Yarn (in colours of your choice)
  • Embroidery hoop
  • Scissors

A DIY pom-pom mobile made from yarn and an embroidery hoop is a fun and stimulating addition to your little one's nursery. Find the full tutorial at www.aburstofbeautiful.com | A Burst of Beautiful

Instructions

  1. Start by making all of your pom poms. I made them in a variety of different sizes for my mobile (in total I made 35 pom poms).
  2. Wrap the yarn around your fingers (I used two fingers for a small pom pom, three fingers for a slightly larger pom pom and four fingers for the largest size). I wrapped the yarn around my fingers about 90 – 100 times.
  3. Cut another piece of yarn in the same colour (about 6 inches long). Thread the yarn between your fingers, tying once loosely. Slide the yarn off of your fingers and tighten the yarn to ensure a secure knot.
  4. Using scissors cut through the loops on both sides.
  5. Fluff the yarn to form a full pom pom.
  6. Trim the yarn to create a uniform looking shape.

A DIY pom-pom mobile made from yarn and an embroidery hoop is a fun and stimulating addition to your little one's nursery. Find the full tutorial at www.aburstofbeautiful.com | A Burst of Beautiful

Next, take apart the embroidery hoop and use the inside hoop (without the metal piece) and wrap it in yarn.

A DIY pom-pom mobile made from yarn and an embroidery hoop is a fun and stimulating addition to your little one's nursery. Find the full tutorial at www.aburstofbeautiful.com | A Burst of Beautiful

Cut five pieces of yarn to your desired length (these pieces should be long enough to gather together and tie at the very top of your mobile and hang as long as you wish at the bottom).

Lay out each piece of yarn and determine the order you’d like your pom poms to be in (consider size and color). Once you are happy with the appearance of your mobile, begin tying the pom poms to the string of yarn by looping it through the piece of yarn used to tie the pom pom in Step 2. Start at the top of the mobile and work your way down. I added one pom pom at the top centre (where all five pieces of yarn meet) and two per piece of yarn before I hit the embroidery hoop.

A DIY pom-pom mobile made from yarn and an embroidery hoop is a fun and stimulating addition to your little one's nursery. Find the full tutorial at www.aburstofbeautiful.com | A Burst of Beautiful
Tie each piece of yarn around the embroidery hoop and finish with a pom pom (this is where I used the largest size). Continue tying on pom poms until you reach the bottom of the yarn.

A DIY pom-pom mobile made from yarn and an embroidery hoop is a fun and stimulating addition to your little one's nursery. Find the full tutorial at www.aburstofbeautiful.com | A Burst of Beautiful

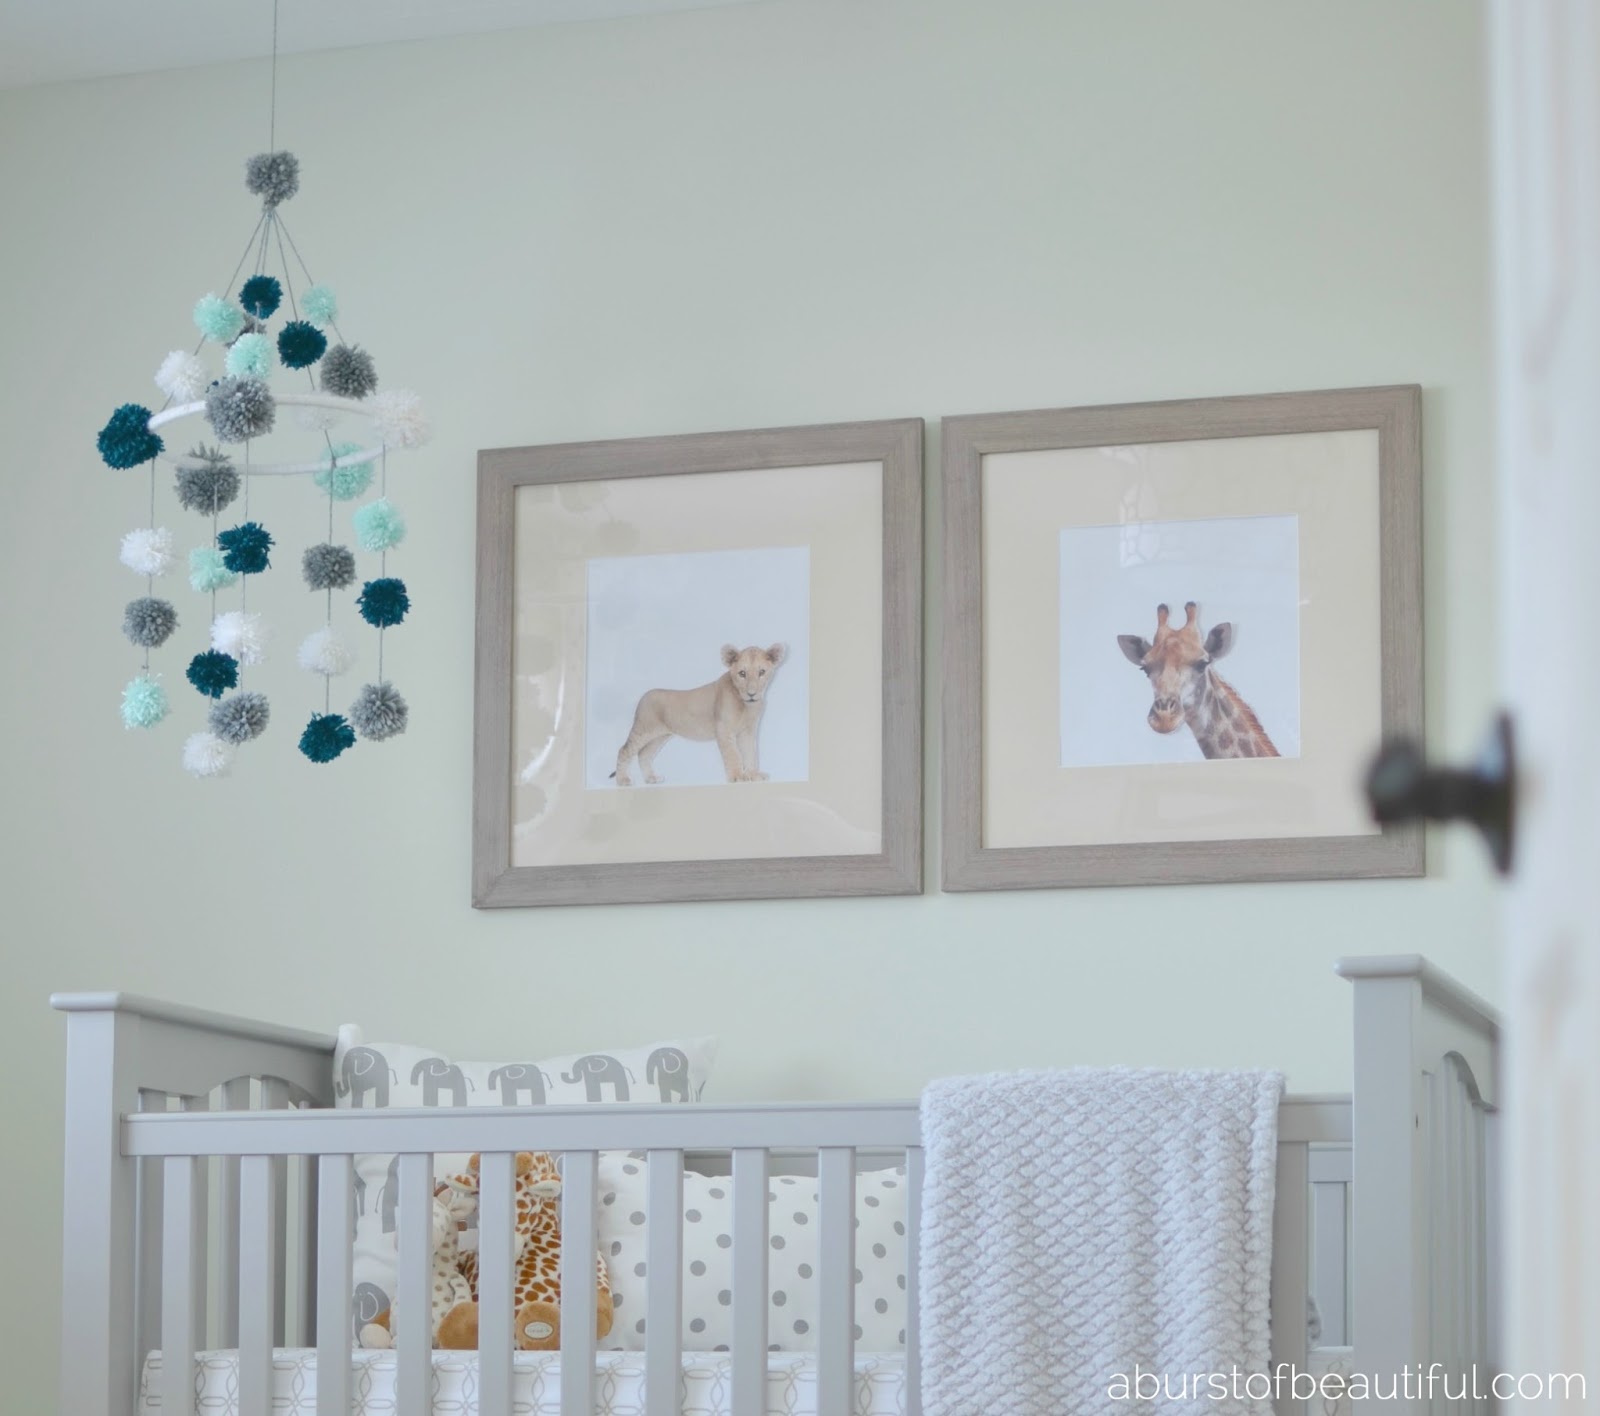
We secured the mobile on the ceiling with an eye hook. Remember to keep the mobile out of reach of your baby, and ensure your mobile is secure so that no pieces are able to fall into the crib.

A DIY pom-pom mobile made from yarn and an embroidery hoop is a fun and stimulating addition to your little one's nursery. Find the full tutorial at www.aburstofbeautiful.com | A Burst of Beautiful

YOU MAY ALSO LIKE...

  • DIY Vintage-Inpsired Toolbox
  • DIY Snow Globe
  • DIY Window Valance

Comments

  1. Family and the Lake House says

    May 13, 2015 at 3:29 am

    I can't even. Seriously. This is so cute…I want to get pregnant again right.now.!!! LOL! Thanks for sharing!

    Reply
    • Alicia says

      May 13, 2015 at 12:42 pm

      Haha! It's pretty cute, isn't it? I love anything with pom poms!

      Reply
  2. Andrea Nine says

    May 13, 2015 at 3:05 pm

    I've been making Pom poms for a couple years now but never thought of a mobile. So sweet!!! Hope you have a wonderful Wednesday!!

    livingoncloudandreanine.blogspot.com

    Reply
    • Alicia says

      May 13, 2015 at 7:32 pm

      Thank you so much Andrea! 🙂

      Reply
  3. Andrea Nine says

    May 13, 2015 at 3:06 pm

    I've been making pom-poms now for about two years. I never thought about a mobile, it is so sweet! hope you have a happy Wednesday.

    livingoncloudandreanine.blogspot.com

    Reply
  4. Stephanie Watkins says

    May 15, 2015 at 2:46 am

    Aww this is so adorable! My cousin just had a baby and this would be so precious in her nursery. Would love for you to share on Friday Favorites. Link up runs all weekend long at http://www.casawatkins.net/2015/05/friday-favorites-109.html

    Reply
    • Alicia says

      May 17, 2015 at 2:26 am

      Thank you Stephanie! We linked up to your Friday Favorites link party, thank you for thinking of us!

      Reply
  5. Little Vintage Cottage says

    May 15, 2015 at 4:28 pm

    Oh my goodness, how sweet!

    Tania

    Reply
    • Alicia says

      May 17, 2015 at 2:26 am

      Thank you Tania!

      Reply
  6. the cape on the corner says

    May 15, 2015 at 4:28 pm

    that is so adorable. the perfect way to bring in pops of color.
    b

    Reply
    • Alicia says

      June 21, 2015 at 7:55 pm

      Thank you so much!

      Reply
  7. Heather{Our Life In a Click} says

    May 15, 2015 at 9:38 pm

    This is so cute! I just got back into pom pom making, I love your fresh take on them! Thanks so much for linking up!

    Reply
    • Alicia says

      May 17, 2015 at 2:27 am

      Thank you Heather! It was such a fun project to make for our little one!

      Reply
  8. Dee Cupcakes&Crowbars says

    June 17, 2015 at 5:16 pm

    Thank you for sharing this at Awesome Things Tuesday last week! You've been pinned to our group board – we would love to see you again!

    Reply
    • Alicia says

      June 21, 2015 at 7:55 pm

      Thank you for sharing on your group board! We will be linking up again! 🙂

      Reply
  9. Bekah says

    April 3, 2020 at 1:12 pm

    Hi! Just wondering if you can tell me what size hoop you used! Looking to make one for my nursery this weekend! Thanks 🙂

    Reply
    • Alicia says

      April 3, 2020 at 1:27 pm

      Hi Bekah, I cannot remember the exact size I used. I think it was probably either a 9″ or 12″ hoop. I’m sorry I can’t be of more help, I made this mobile about 5 years ago for our first baby and my memory is failing me! Good luck and please let us know how it turns out! 🙂

      Reply
  10. stucco says

    January 19, 2021 at 6:43 am

    These are great tips for the DIY homeowner.

    Reply
  11. angies list says

    February 1, 2021 at 7:35 am

    Lovely pompom and decoration also.

    Reply
  12. Thumbtack says

    February 1, 2021 at 10:12 pm

    Hello Alicia. Thank you so much for sharing this wonderful idea. DIY projects are fun during this pandemic.. 🥰

    Reply
    • Alicia says

      February 9, 2021 at 10:06 am

      So glad you enjoyed it!

      Reply

Leave a Reply Cancel reply

Your email address will not be published. Required fields are marked *

A place to find design inspiration, entertaining ideas and simple recipes. Take a few minutes to learn more about us, shop our favourite things and sign up for our weekly newsletter.

JOIN OUR NEWSLETTER

I am so glad we added miniature trees to the girls I am so glad we added miniature trees to the girls' bedrooms this year. They absolutely loved having their very own tree to decorate with their collection of ornaments and handmade treasures.It was a simple and inexpensive way to add an extra dose of holiday magic to their rooms, after all, there is nothing better than witnessing Christmas through the eyes of a child. They truly find such beauty and magic in even the smallest of details. 🎄
This view looks a little bit different this year a This view looks a little bit different this year as we're in the middle of our kitchen renovation. See that little half-wall with the hats, well we've removed it so that we see right into the kitchen now and it's amazing! We've been making great progress, just yesterday our new sink, faucet, and counters were all installed. It's all of these little changes that are making such a big difference. We'll have a few more details to take care of after the holidays, but we're really looking forward to crossing the finish line and sharing it all with you!
I wish our dining looked this tidy at the moment! I wish our dining looked this tidy at the moment! It’s currently under a pile of toys and kitchen essentials. If you’ve been following along with our behind the scenes account, @nick.and.alicia.bts, you’ll know we’re making some big progress on the kitchen. Early next week our window and countertop will be installed, so Nick’s been busy removing our existing counters and sink. It’s so exciting to see it all come together and I’ll be happy to have running water again next week!
Most of our snow has melted, but I'm hopeful we wi Most of our snow has melted, but I'm hopeful we will have a white Christmas this year! I just think everything is a bit more magical when covered in a blanket of fresh snow. ❄⁣ ⁣ Are you team snow or no?
Earlier this week we shared our holiday home tour, Earlier this week we shared our holiday home tour, and now we’re giving you a closer look at the girls’ bedrooms, along with a few helpful tips for decorating kids’ spaces for the holiday season.Do you decorate your little ones’ bedrooms for Christmas?
This year I took my time while decorating our home This year I took my time while decorating our home for the holidays and focused on incorporating simple touches that bring us joy and evoke the spirit of Christmas. Our home feels cozy and inviting, and the girls are loving every minute of the holiday season. 🎅🏼Stop by our blog, nickandalicia.com, to see our holiday home tour, along with new tours added every day this week! Tap to see who joined us yesterday.
Sometimes all it takes is a bow to add a festive t Sometimes all it takes is a bow to add a festive touch for the holiday season! 💙

Join our Newsletter

Copyright ©2021 Nick + Alicia
  • Contact
  • POLICIES + DISCLOSURE