• Blog
  • About
  • Shop Our Instagram
  • Weekly Newsletter
  • Contact
  • HOUSE + HOME
    • All House + Home
    • Mudroom
    • Kitchen
    • Dining Room
    • Living Room
    • Bedroom
    • Kids Bedrooms
    • Family and Playroom
    • Office
    • Outdoor Living
    • Woodworking
  • LIFE + STYLE
    • All Life + Style
    • Entertaining
    • Holidays
  • FOOD + DRINK
    • All Food + Drink
    • Appetizers
    • Drinks
    • Breakfast
    • Dinner
    • Dessert
  • Shop
    • Our Home
    • Window Shades
    • Paint Colors
    • Nick’s Workshop

Nick + Alicia

Lifestyle

June 9, 2015 | by Alicia

DIY Tea Towel Art

A few weeks ago while my sister was visiting we decided to take a little road trip to a resort town not far from our city. We spent the day browsing antique stores and gorgeous little boutiques.

DIY Tea Towel Art

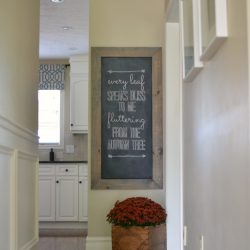
At our last stop of the day I came across this beautiful tea towel. I love the natural look of the linen, it has such a rustic and organic quality to it.

DIY Tea Towel Art
And once I began reading the words printed on it, it became even more special. It is such a beautiful reminder of the importance of love. And what a blessing it is to have it in your life.

DIY Tea Towel Art

I knew I had to have it, but thought the message was too special to be hidden away under the kitchen sink. So I started thinking about where I could display it in our home.

DIY Tea Towel Art

I thought it would look beautiful framed in a simple wood frame in our bedroom. So I scooped it up and headed home with an easy DIY project for the mister.

DIY Tea Towel Art

I’m still debating where to hang it, but for now it looks beautiful perched on our dresser in our newly made-over bedroom.

DIY Tea Towel Art


Supplies:


  • Staple Gun
  • 1″ x 2″ piece of wood of your choice (length will depend on size of tea towel you have)
  • Small ‘L’ brackets

Instructions:

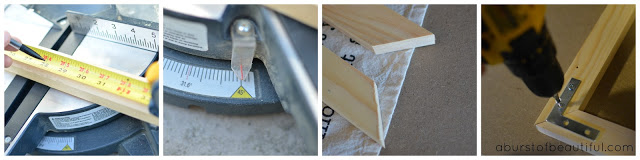
  1. Measure tea towel and subtract 2″ in height and length.  For the sake of this tutorial we will use the following example: if the towel is 18 x 28″, the measurement you will use for making the frame is 16 x 26″.
  2. Cut two pieces at 16″ creating a 45 degree angle on either end.  Cut the other two at 26″ with 45 degree angles on either end.
  3. Lay out the frame on the ground and square it up.
  4. Using ‘L’ brackets secure each corner.
  5. Spray paint the frame any colour you choose (or stain it).
  6. Once it is dry stretch the tea towel across the back of the frame and staple all the way around, but being careful to keep it even.  Turn it over and check it every once and a while to make sure you have it centred.  If you make a mistake you can use a screwdriver to remove the staples and start again!

DIY Tea Towel Art

DIY Tea Towel Art

YOU MAY ALSO LIKE...

  • DIY Vintage-Inpsired Toolbox
  • DIY Window Valance
  • Fall Chalkboard Art

Comments

  1. making it in the mountains says

    June 9, 2015 at 1:58 pm

    LOVE, LOVE, LOVE this!!!

    Reply
    • Alicia says

      June 10, 2015 at 1:41 am

      Thank you Kristi!

      Reply
  2. Teresa says

    July 10, 2015 at 8:19 pm

    Was there an author attributed to this fantastic quote? It looks wonderful framed, and so perfect for your bedroom!

    Reply
    • Alicia says

      July 10, 2015 at 9:49 pm

      Hi Teresa,

      Thank you so much! Unfortunately there was no author associated with the quote. I was trying to find that out for myself as well.

      Reply
    • Nick says

      July 14, 2015 at 4:05 pm

      Hi Teresa,

      We managed to find the title and author of the quote – "This is What Love is" by Coulson Macleod

      Reply
  3. Erica Thomas says

    March 4, 2016 at 9:15 pm

    Hi,
    It’s my first time here. Love the site!! I also love this saying and what you did to incorporate it into your home.

    Reply
    • Alicia says

      March 5, 2016 at 1:02 pm

      Hi Erica, I’m so glad you stopped by, thanks for saying hello! xo

      Reply

Leave a Reply Cancel reply

Your email address will not be published. Required fields are marked *

A place to find design inspiration, entertaining ideas and simple recipes. Take a few minutes to learn more about us, shop our favourite things and sign up for our weekly newsletter.

JOIN OUR NEWSLETTER

I am so glad we added miniature trees to the girls I am so glad we added miniature trees to the girls' bedrooms this year. They absolutely loved having their very own tree to decorate with their collection of ornaments and handmade treasures.It was a simple and inexpensive way to add an extra dose of holiday magic to their rooms, after all, there is nothing better than witnessing Christmas through the eyes of a child. They truly find such beauty and magic in even the smallest of details. 🎄
This view looks a little bit different this year a This view looks a little bit different this year as we're in the middle of our kitchen renovation. See that little half-wall with the hats, well we've removed it so that we see right into the kitchen now and it's amazing! We've been making great progress, just yesterday our new sink, faucet, and counters were all installed. It's all of these little changes that are making such a big difference. We'll have a few more details to take care of after the holidays, but we're really looking forward to crossing the finish line and sharing it all with you!
I wish our dining looked this tidy at the moment! I wish our dining looked this tidy at the moment! It’s currently under a pile of toys and kitchen essentials. If you’ve been following along with our behind the scenes account, @nick.and.alicia.bts, you’ll know we’re making some big progress on the kitchen. Early next week our window and countertop will be installed, so Nick’s been busy removing our existing counters and sink. It’s so exciting to see it all come together and I’ll be happy to have running water again next week!
Most of our snow has melted, but I'm hopeful we wi Most of our snow has melted, but I'm hopeful we will have a white Christmas this year! I just think everything is a bit more magical when covered in a blanket of fresh snow. ❄⁣ ⁣ Are you team snow or no?
Earlier this week we shared our holiday home tour, Earlier this week we shared our holiday home tour, and now we’re giving you a closer look at the girls’ bedrooms, along with a few helpful tips for decorating kids’ spaces for the holiday season.Do you decorate your little ones’ bedrooms for Christmas?
This year I took my time while decorating our home This year I took my time while decorating our home for the holidays and focused on incorporating simple touches that bring us joy and evoke the spirit of Christmas. Our home feels cozy and inviting, and the girls are loving every minute of the holiday season. 🎅🏼Stop by our blog, nickandalicia.com, to see our holiday home tour, along with new tours added every day this week! Tap to see who joined us yesterday.
Sometimes all it takes is a bow to add a festive t Sometimes all it takes is a bow to add a festive touch for the holiday season! 💙

Join our Newsletter

Copyright ©2021 Nick + Alicia
  • Contact
  • POLICIES + DISCLOSURE