
I am so excited to be joining some of my favorite blogging friends today to share our best farmhouse-inspired DIY projects, including our simple DIY angled blanket ladder.
Our home is a relatively new house, but we love incorporating farmhouse elements into each room to create an inviting and beautiful space. I always call our style modern farmhouse, as I think it’s a perfect blend of our fresh and young design style with charming details from an old way of life. You can take a closer look at how we’ve created this mix in our kitchen, dining room, living room and bedroom.
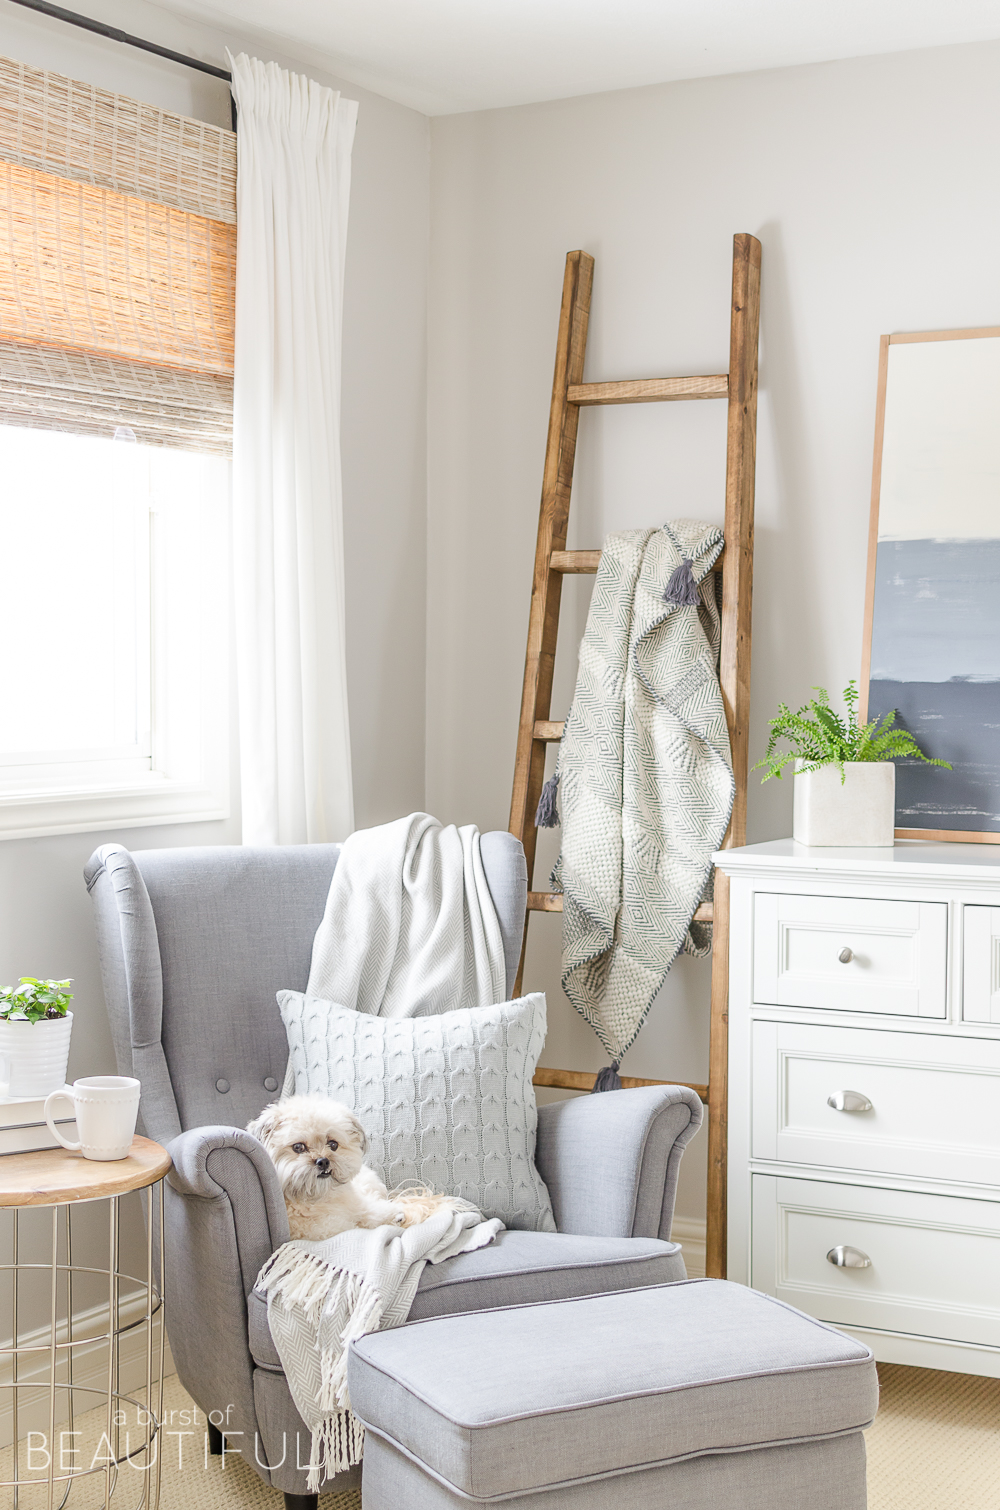
So when the opportunity came up to share a DIY farmhouse-inspired project with you, we had so many ideas to choose from. Ultimately we settled on an easy project anyone can tackle – a simple DIY angled blanket ladder.

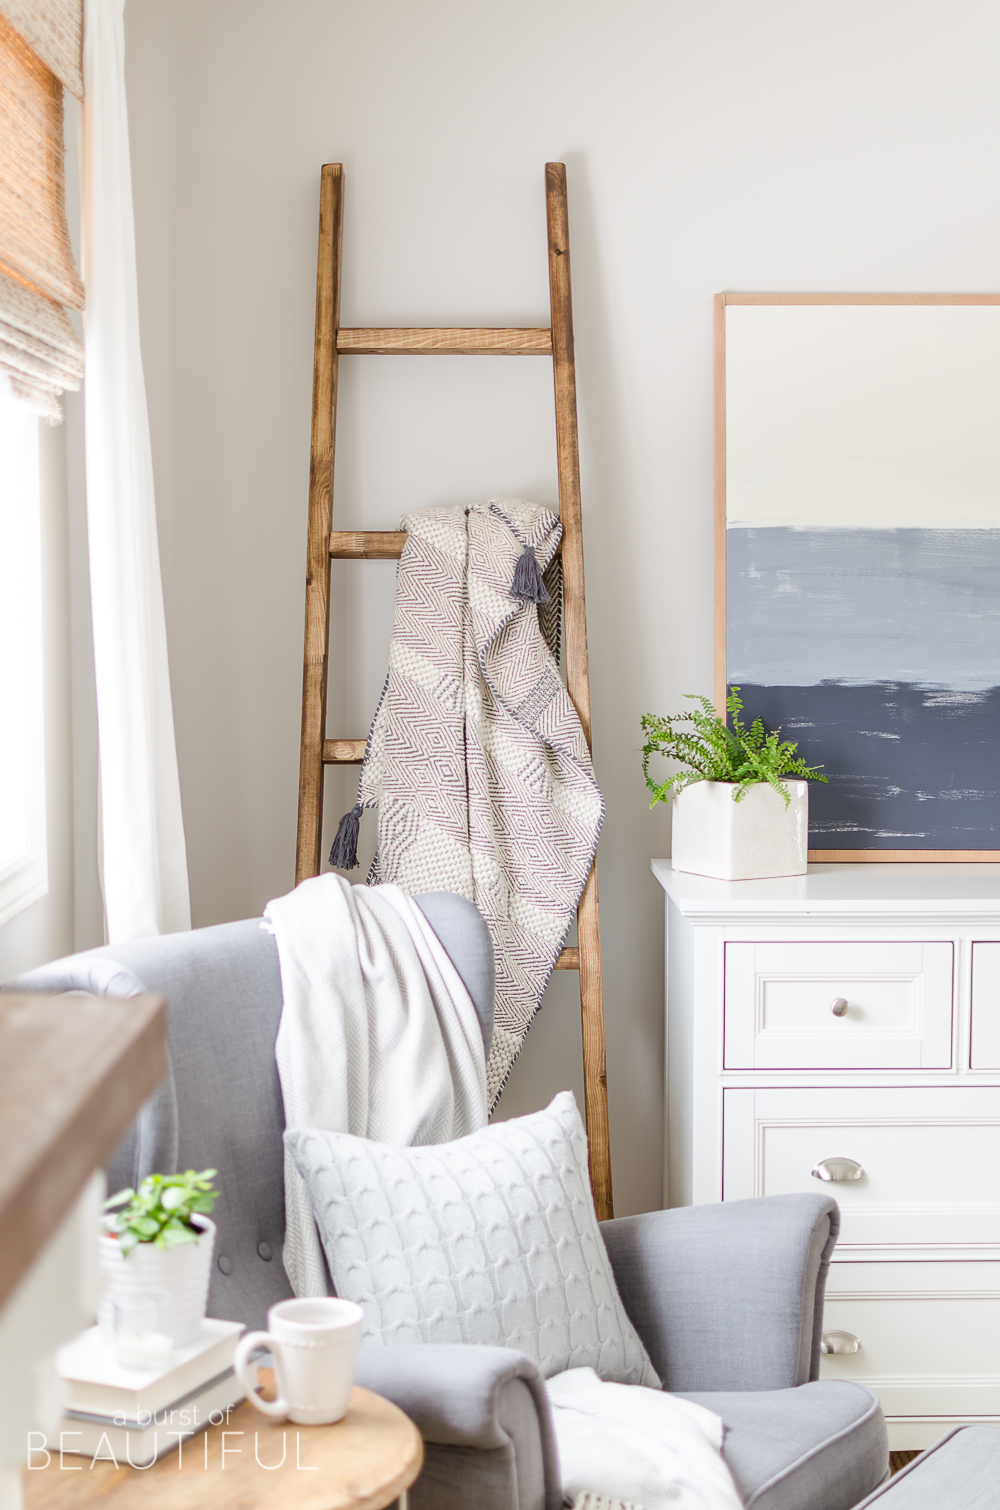
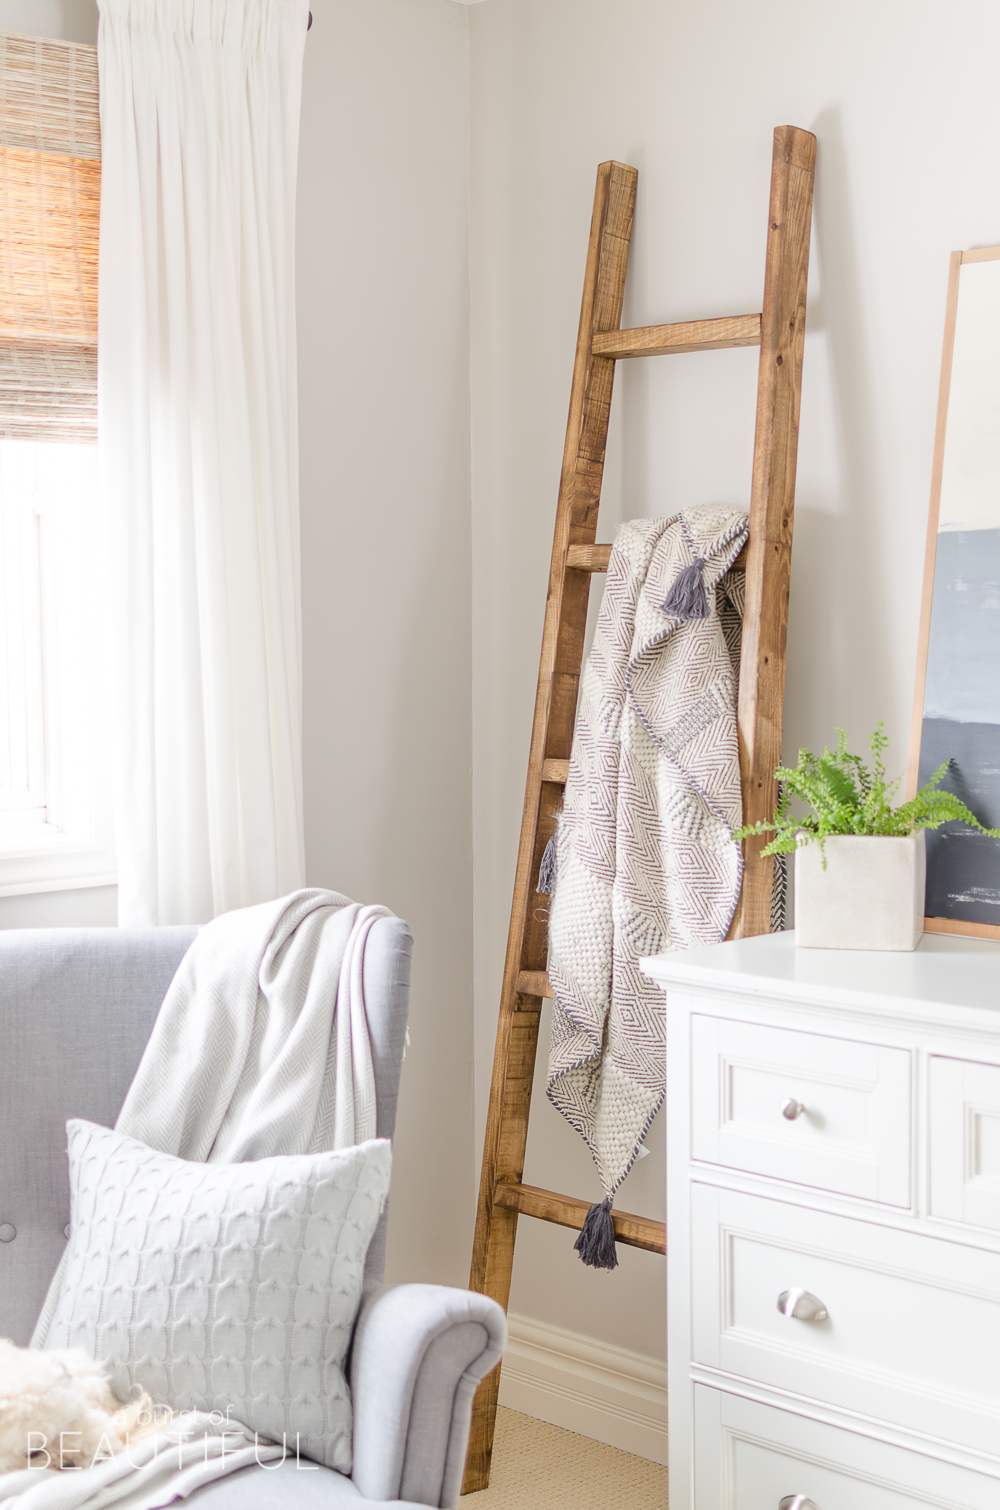
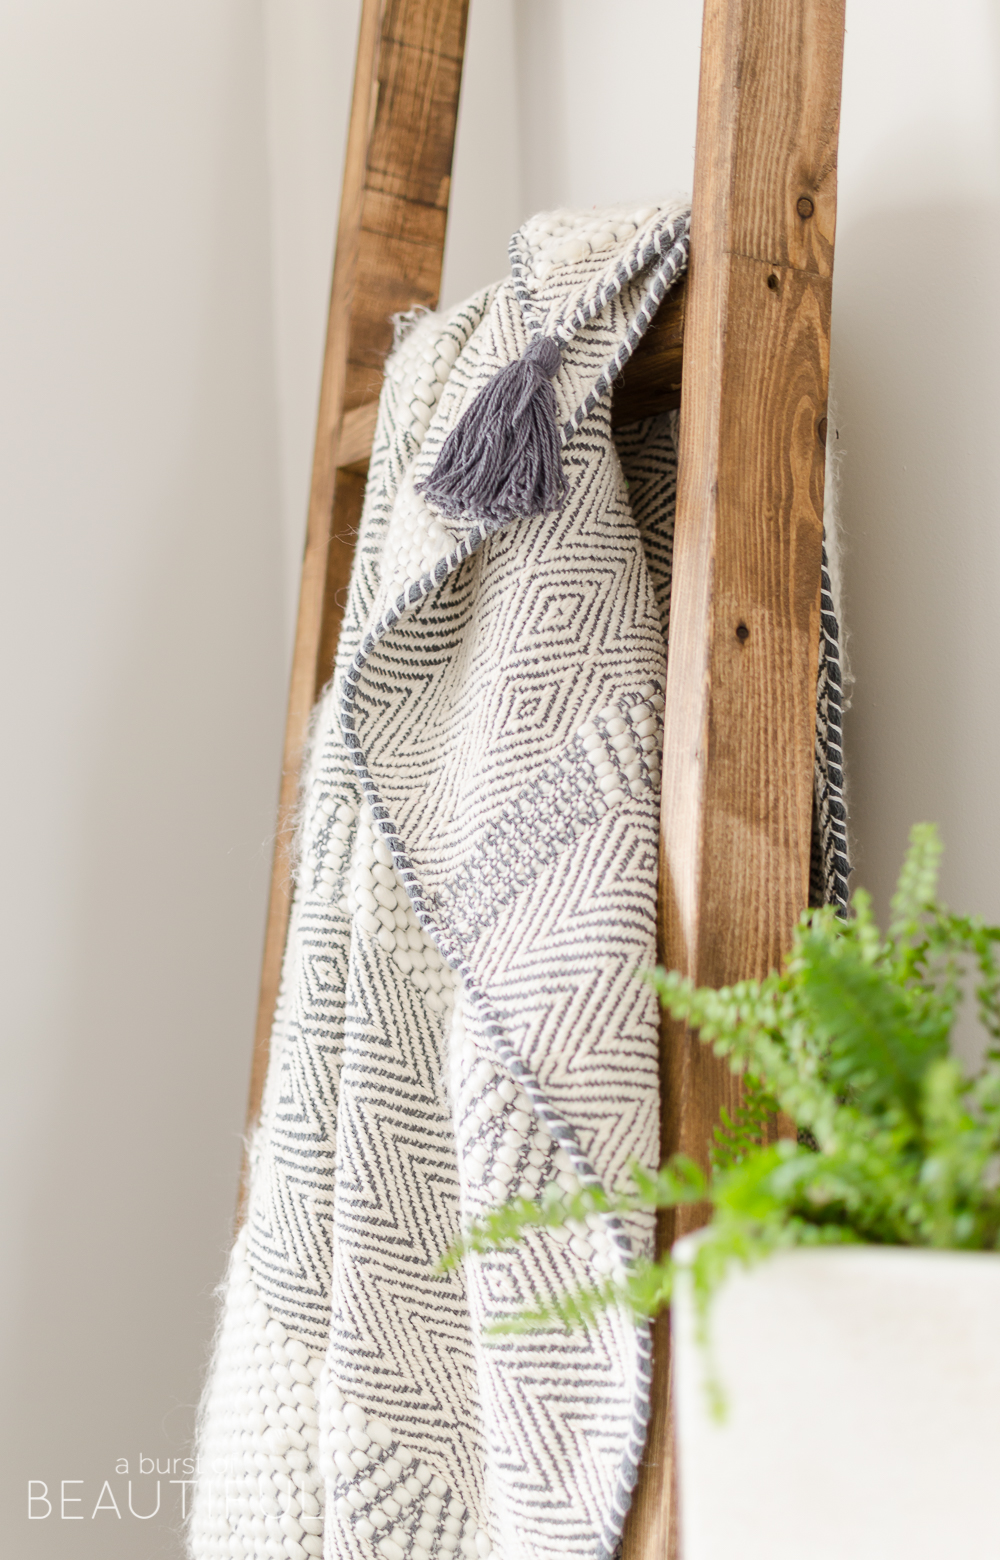
We have a few of these beautiful ladders scattered throughout our home – in our living room, nursery and now our bedroom. They are a great way to add height and texture to a bare wall and look beautiful with a simple blanket draped over a rung. I sometimes even like to hang a wreath from these ladders for a festive touch during the holidays.
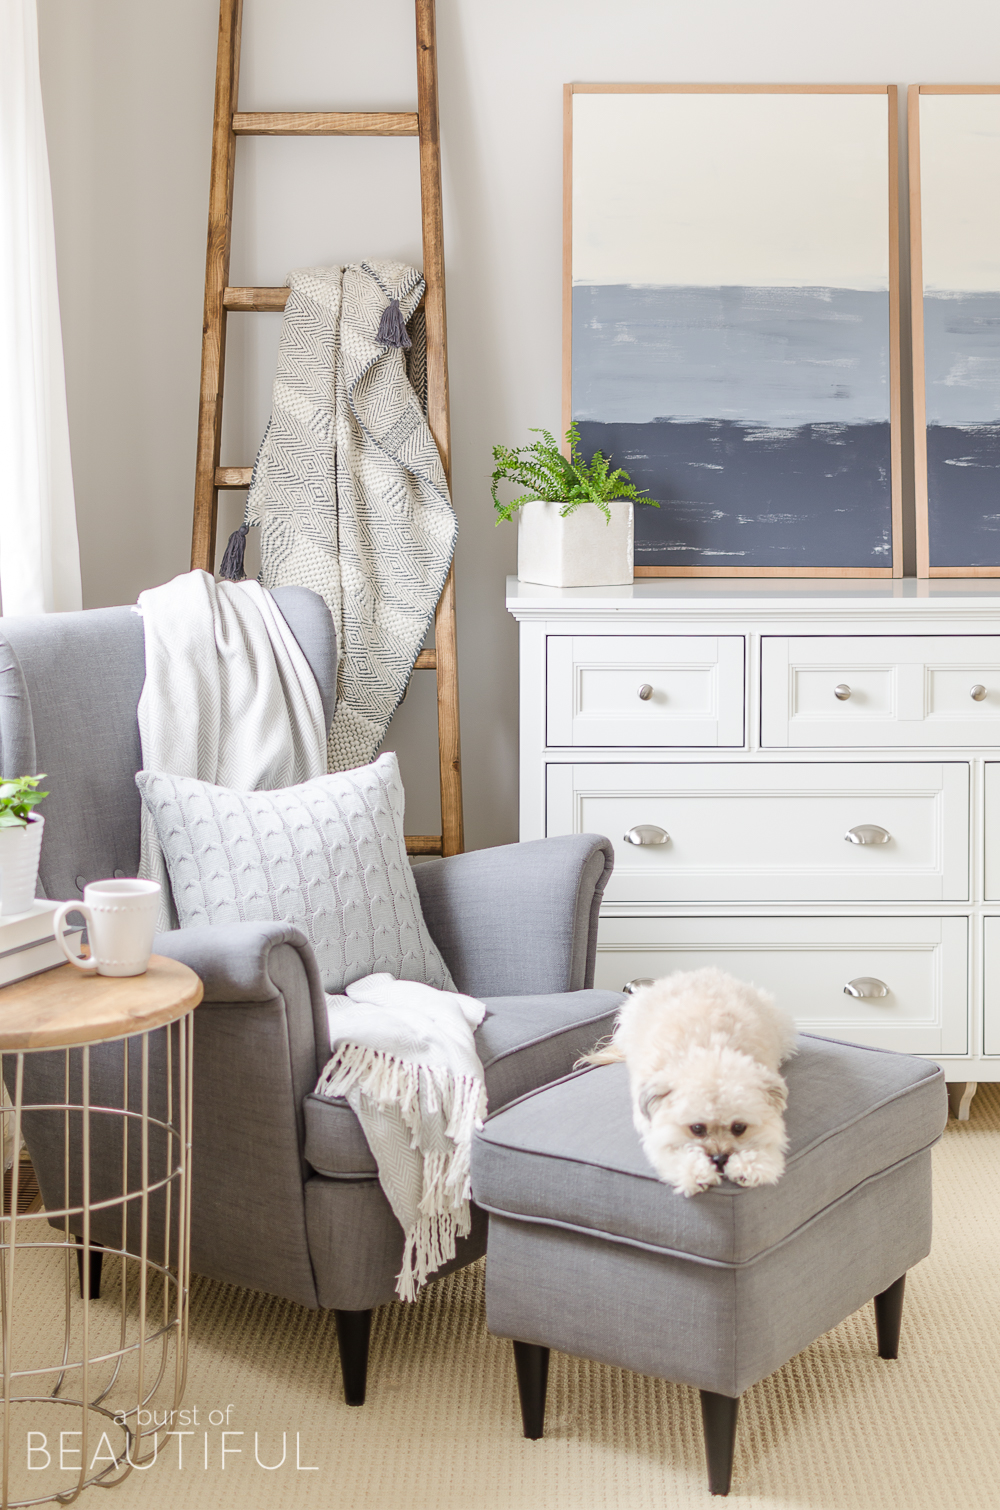
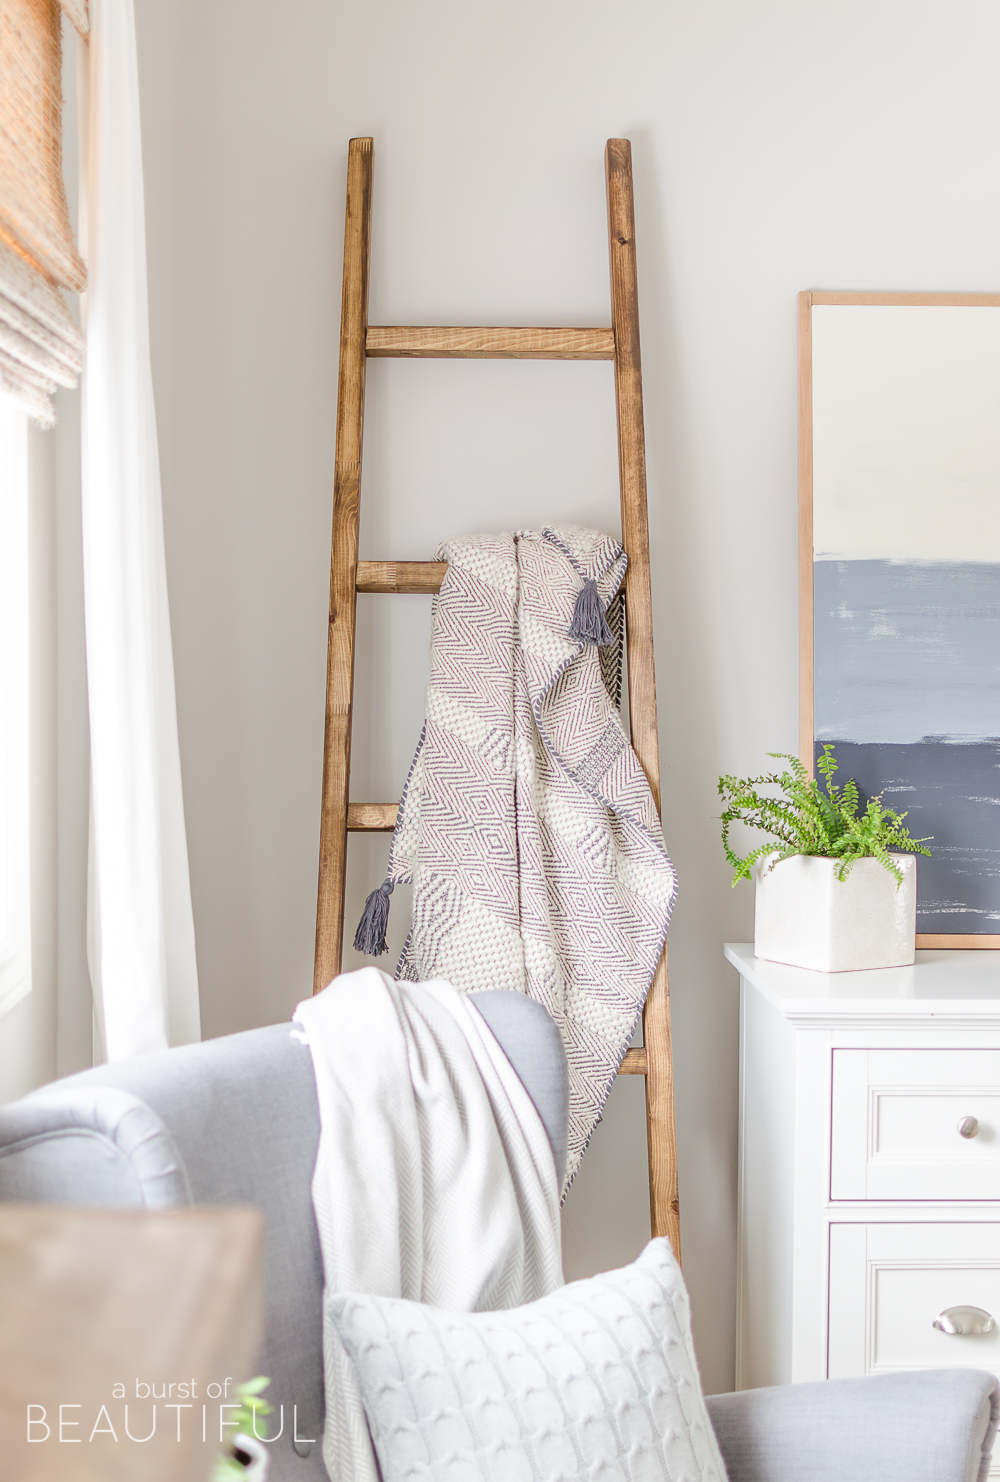
We made this blanket ladder a little bit taller than the other’s we already own, as I wanted it to fill in the wall in our bedroom beside our dresser. I love the added height it brings to the space.
Get the Look


I kept it very simply by casually draping this beautifully textured throw over one of the rungs. As we endure the last few months of cold weather, it’s always nice to have extra blankets on hand.
Our little pup couldn’t agree more. Isn’t she cute?

Simple DIY Angled Blanket Ladder Tutorial
Materials
- 3 – 2″ x 3″ x 8′ framing lumber
- 20 – 2 1/2″ wood screws
- Wood Glue
Tools and supplies
Steps
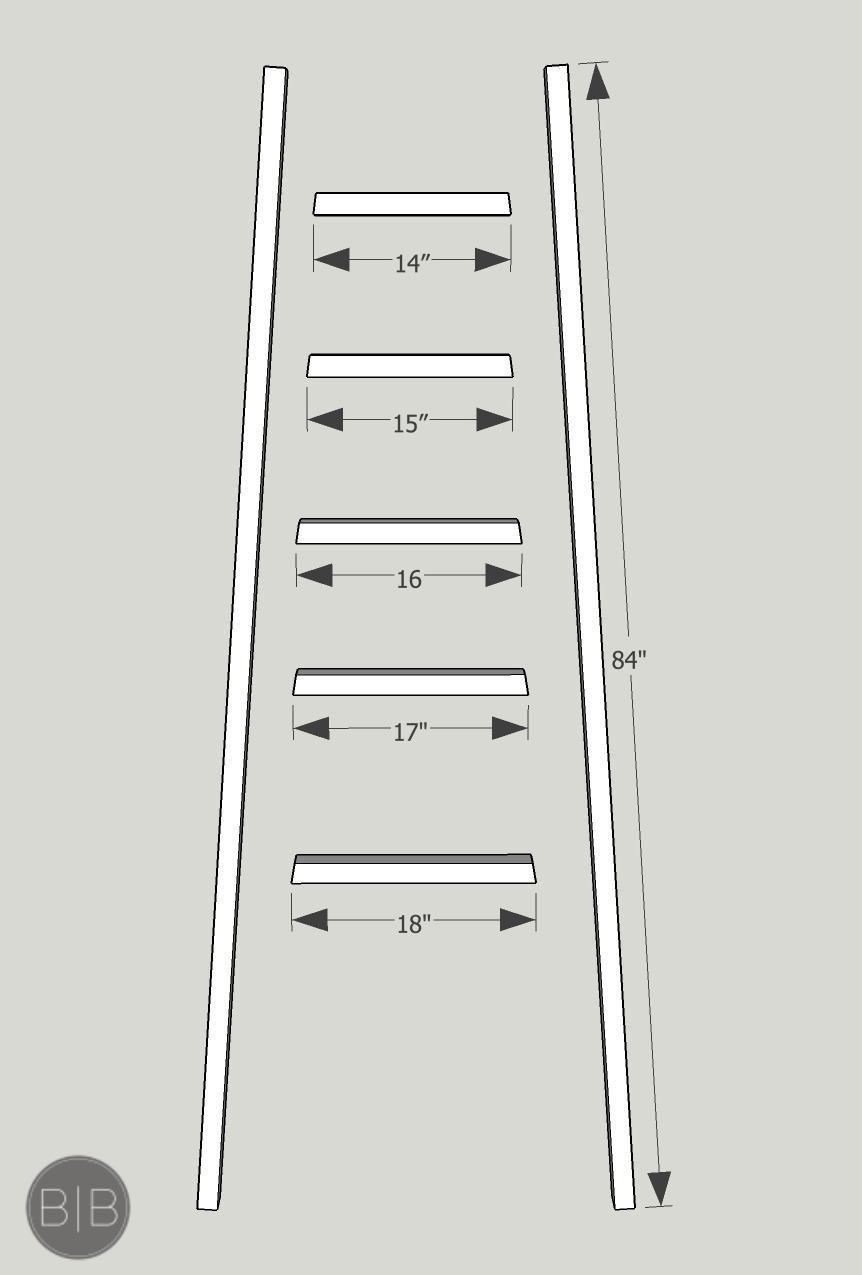
- Cut 2 – 2″ x 3″ x 8′ framing lumber pieces down to 7′ (84″) for the sides.
- Lay them down on a flat surface with the 2″ side against the floor.
- Cut the third 2″ x 3″ x 8′ framing lumber to 18″, 17″, 16″, 15″ and 14″ step pieces, with 4 degree angles on each end.
- Place the 18″ step piece approximately 18″ from the bottom of the sides. Do not attach yet.
- Then lay out each subsequent piece approximately 12″ apart going up the ladder.
- You may have to make some adjustments up and down for each of the steps to get them to fit snugly and square.
- Attach the steps using 2 – 2 1/2″ wood screws by drilling them from the outside of the side piece directly into the step.
- Sand, stain (we chose Minwax Provincial) and hang your blankets (once it’s dry of course!).
*This ladder is for decorative purposes only.
It’s a very simple project, but it adds a lot of character and really helps to cozy up any room in your home. Blanket ladders are even great in bathrooms used to display beautiful hand towels. Do you like to use blanket ladders, or how do you store your extra throws?

Please make sure you take a minute to check out the rest of these beautiful and inspiring farmhouse DIY projects…

Farmhouse Style Mantel Shelf from The Mountain View Cottage
Simple DIY Angled Blanket Ladder Tutorial from A Burst of Beautiful
Printable Barn Quilt Wall Banner from Delightfully Noted
How to Force Bulbs Indoors from Tidbits
DIY Linen Pillow Covers from Boxwood Avenue
Easy DIY Chalkboard from A House and a Dog
Farmhouse Hanging Glass Bottles from Seeking Lavender Lane
DIY Rustic Wooden Tote from Little Glass Jar
Simple Farmhouse Decor from The Homemaking Momma
DIY Linen and Flannel Throw Blanket from Farmhouse on Boone
Alicia xo


Jennifer says
I NEED a ladder like this! It’s soooo gorgeous!
Alicia says
Thank you, Jennifer! They are so simple to make, I think I need one in every room in our home! 🙂
Zarina says
Dear Alicia, I just received your latest e-mail newsletter and I just wanted to say – you are so talented! I love how tasteful your home is! Thank you for sharing your great ideas and projects with the world.
Alicia says
Thank you for your sweet comment Zarina – you brought a smile to my face during a difficult week. 🙂
Deb says
This is so gorgeous Alicia! I love a great blanket ladder.
Alicia says
Thank you, Deb! We have a blanket ladder in almost every room in our home! 😉
Kelly says
Love this DIY project and you made it look so easy! I like the look of the taller ladder – it definitely adds more dimension to the room.
Best,
Kelly
P.s. your pup is adorable 🙂
Alicia says
Thank you, Kelly. 🙂 I think the taller ladder was just what this corner needed to help fill in that empty space! xo
Jamin says
I love the ladder, we built one for our old bathroom and it does so much for the visual in a space. Great job, y’all rocked the execution of this space!
Alicia says
Thank you, Jamin! I feel like our home is finally starting to feel complete 🙂
Jessica Bermudez says
Do the step pieces need to be cut at a 4 degree angle? I don’t own a saw so I was going to have the hardware store do the cutting for me so I figured they would only do straight cuts.
Nick says
Hi Jessica,
They do need to be cut at the angle to make the ladder appear angled. But if you want, you can just cut them at 90 degrees (straight) and all the same length and it will create a straight ladder.
Hope this helps!
Justin says
Hi,
What color of stain did you use?
Thanks,
Justin
Alicia says
Hi Justin,
We used Early American by Minwax for the blanket ladder. 🙂
Catie says
Just a heads up, in the instructions you wrote that you used Minwax Provincial as the stain!
Nick says
Thanks Catie! Now I’m second guessing which one I used on this project! 😉
Provincial and Early American are my two favorite go-to stain colors. They’re very close to the same, so you can’t go wrong with either one! I think Early American is a bit more brown than golden.
Claire says
What a gorgeous ladder! What kind of wood did you use! Thanks for the inspiration!
Nick says
Hi Claire,
This was made out of just plain old 2×3″ framing lumber! Good and cheap!
Ron says
Hi – like the looks of this…. how did you “hide” the screws from the outside of the ladder? Looking at your photos I do not see the screws from outside the ladder…. cool!
Nick says
Hi Ron,
There are a couple of methods you could use to hide them. You can simply let them naturally countersink into the lumber and then fill the screw holes with wood filler. Two, you could countersink and then glue some wood dowels into the holes that are the same size as the screw head. Three, you could use pocket holes (if you have a Pocket Hole Tool) on the under-side of each ladder rung. I found the stain hides the screw holes fairly well.
Kristi says
Hi, love your blog! I’m wodering where you got your dresser and gray chair, if you wouldn’t mind sharing?? ?
Alicia says
Thank you, Kristi! 🙂 We purchased our dresser from a local furniture store, but I have found the exact same one on Wayfair (here). And the gray wingback chair is from Ikea, we bought it a few years ago but I think they have a similar one still. I hope that helps!
Dan says
Hi do you angle the bottom so the wood sits flat on floor or no?
Alicia says
Hi Dan, yes, Nick cut them on a slight angle. I hope that helps, let us know if you have any other questions!
Anna Phillips says
I just love reading your posts! I know this is off topic, but would you mind sharing where the art is from on your dresser!? I’m looking for something very similar and it is so hard to find!! Thank you!!
Alicia says
Hi Anna, I just saw your comment on this post! 🙂 This art was actually a DIY. I picked up a large canvas from our arts and craft store and a few different shades of blue paint and just got creative. Once I was finished Nick framed it out, and that was it. I had a hard time finding art this size that didn’t cost a fortune, and it was fun to make. I think you should give it a try!
Anna says
Yes, it’s so true! Art is SO expensive.
Well, it’s beautiful and I would pay for something like it, so maybe you should consider going into that business!? I’m so impressed!!
Alicia says
Thank you, Anna! It was fun to make, it’s always nice to take a little time to be creative. 🙂
Whitney Goodwin says
How did you get the 4degrees angle? Did you use a tool to measure this?
Nick says
Hi Whitney, at the time, I think I just used a cheap protractor that I got from the dollar store out of a school math kit!
Debbie irving says
Thank you my boys just finished one for me
Alicia says
That is so nice to hear, thank you for sharing with us Debbie!
Kelli C Mallinger says
I thought at one time you had said where you got your living room roman shades from but I cannot find it anywhere on your site. Could you share that information
Alicia says
Of course, Kelli! You can find all of the information on our window shades if you go to Shop -> Window Shades, or simply search “window shades”. Please let me know if you have any other questions! 🙂