• Blog
  • About
  • Shop Our Instagram
  • Weekly Newsletter
  • Contact
  • HOUSE + HOME
    • All House + Home
    • Mudroom
    • Kitchen
    • Dining Room
    • Living Room
    • Bedroom
    • Kids Bedrooms
    • Family and Playroom
    • Office
    • Outdoor Living
    • Woodworking
  • LIFE + STYLE
    • All Life + Style
    • Entertaining
      • Tablescapes
      • Birthday Parties
    • Seasons
      • Spring
      • Summer
      • Fall
      • Winter
    • Holidays
      • Valentine’s Day
      • Easter
      • Thanksgiving
      • Halloween
      • Christmas
  • FOOD + DRINK
    • All Food + Drink
    • Appetizers
    • Drinks
    • Breakfast
    • Dinner
    • Dessert
    • Seasonal
      • Easter Recipes
      • Fall Recipes
      • Halloween Recipes
      • Christmas Recipes
  • Shop
    • Our Home
      • Kitchen
      • Living and Dining Room
      • Powder Room
      • Zoe’s Bedroom
      • Ella’s Nursery
      • Family Room and Playroom
      • Outdoor Living
    • Window Shades
    • Paint Colors
    • Nick’s Workshop

Nick + Alicia

Lifestyle

March 30, 2020 | by Alicia

How To Create a Gallery Wall

Gallery walls are a great way to infuse interest and personality to any space. Learn how to create a curated gallery wall to display your favourite photos or art with these easy ideas. 

Gallery walls are a popular choice for displaying art, and for good reason. With a little thought, you can create a polished and sophisticated collection of art in your home. It’s an easy and inexpensive way to create a big visual impact, all you need is a collection of art and picture frames, a blank wall and a few hours of your time.  

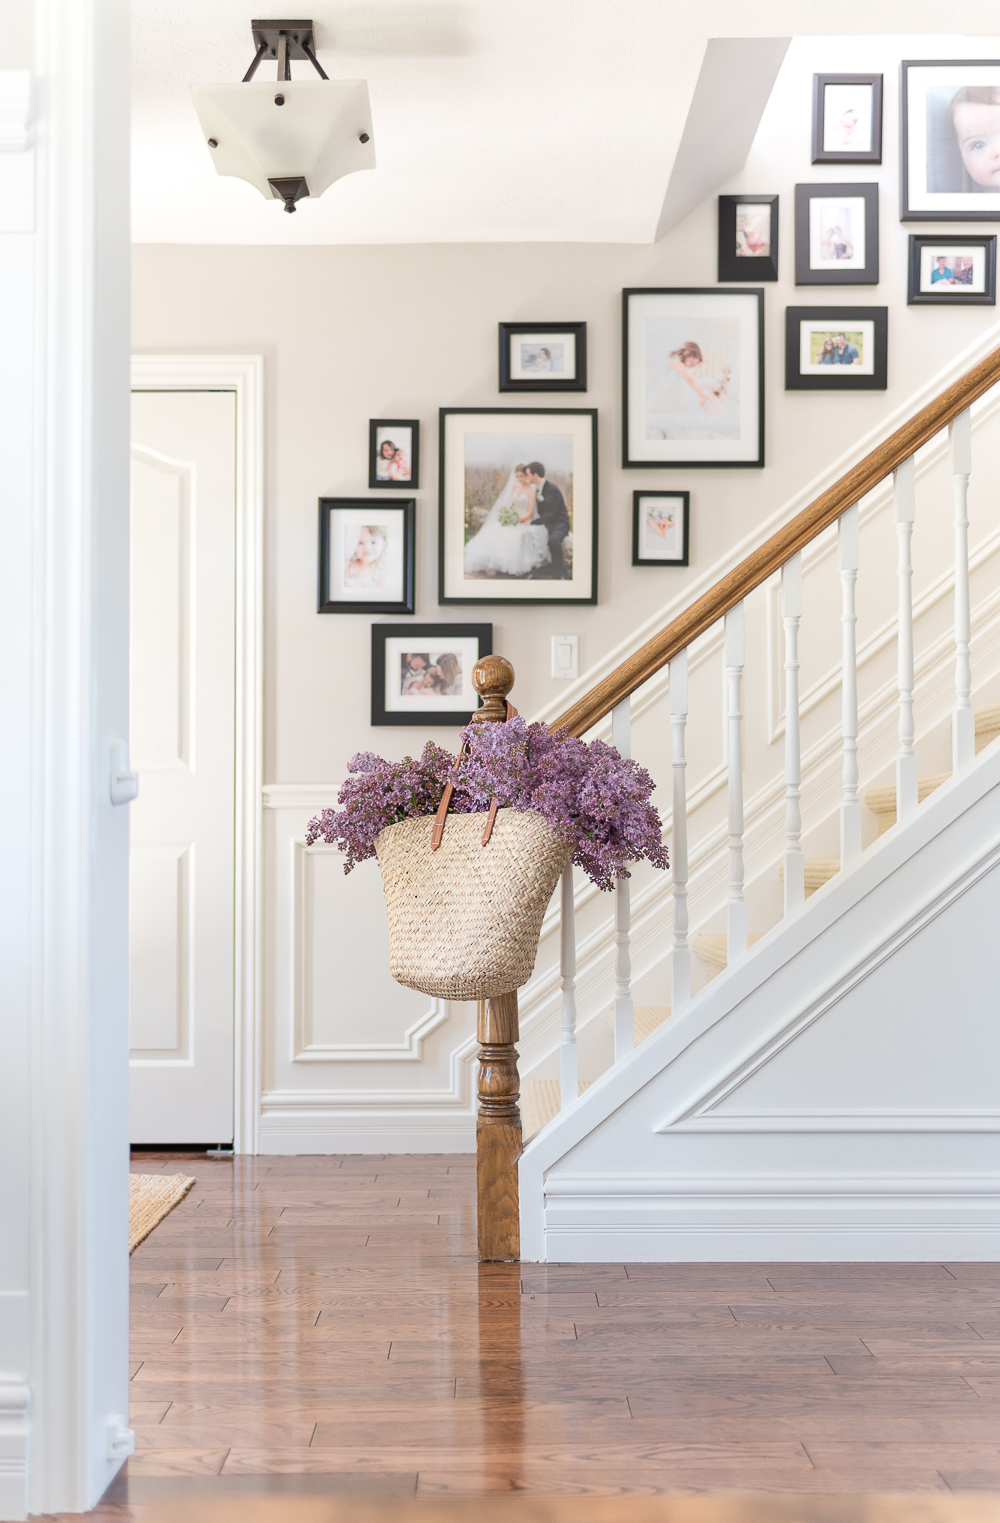
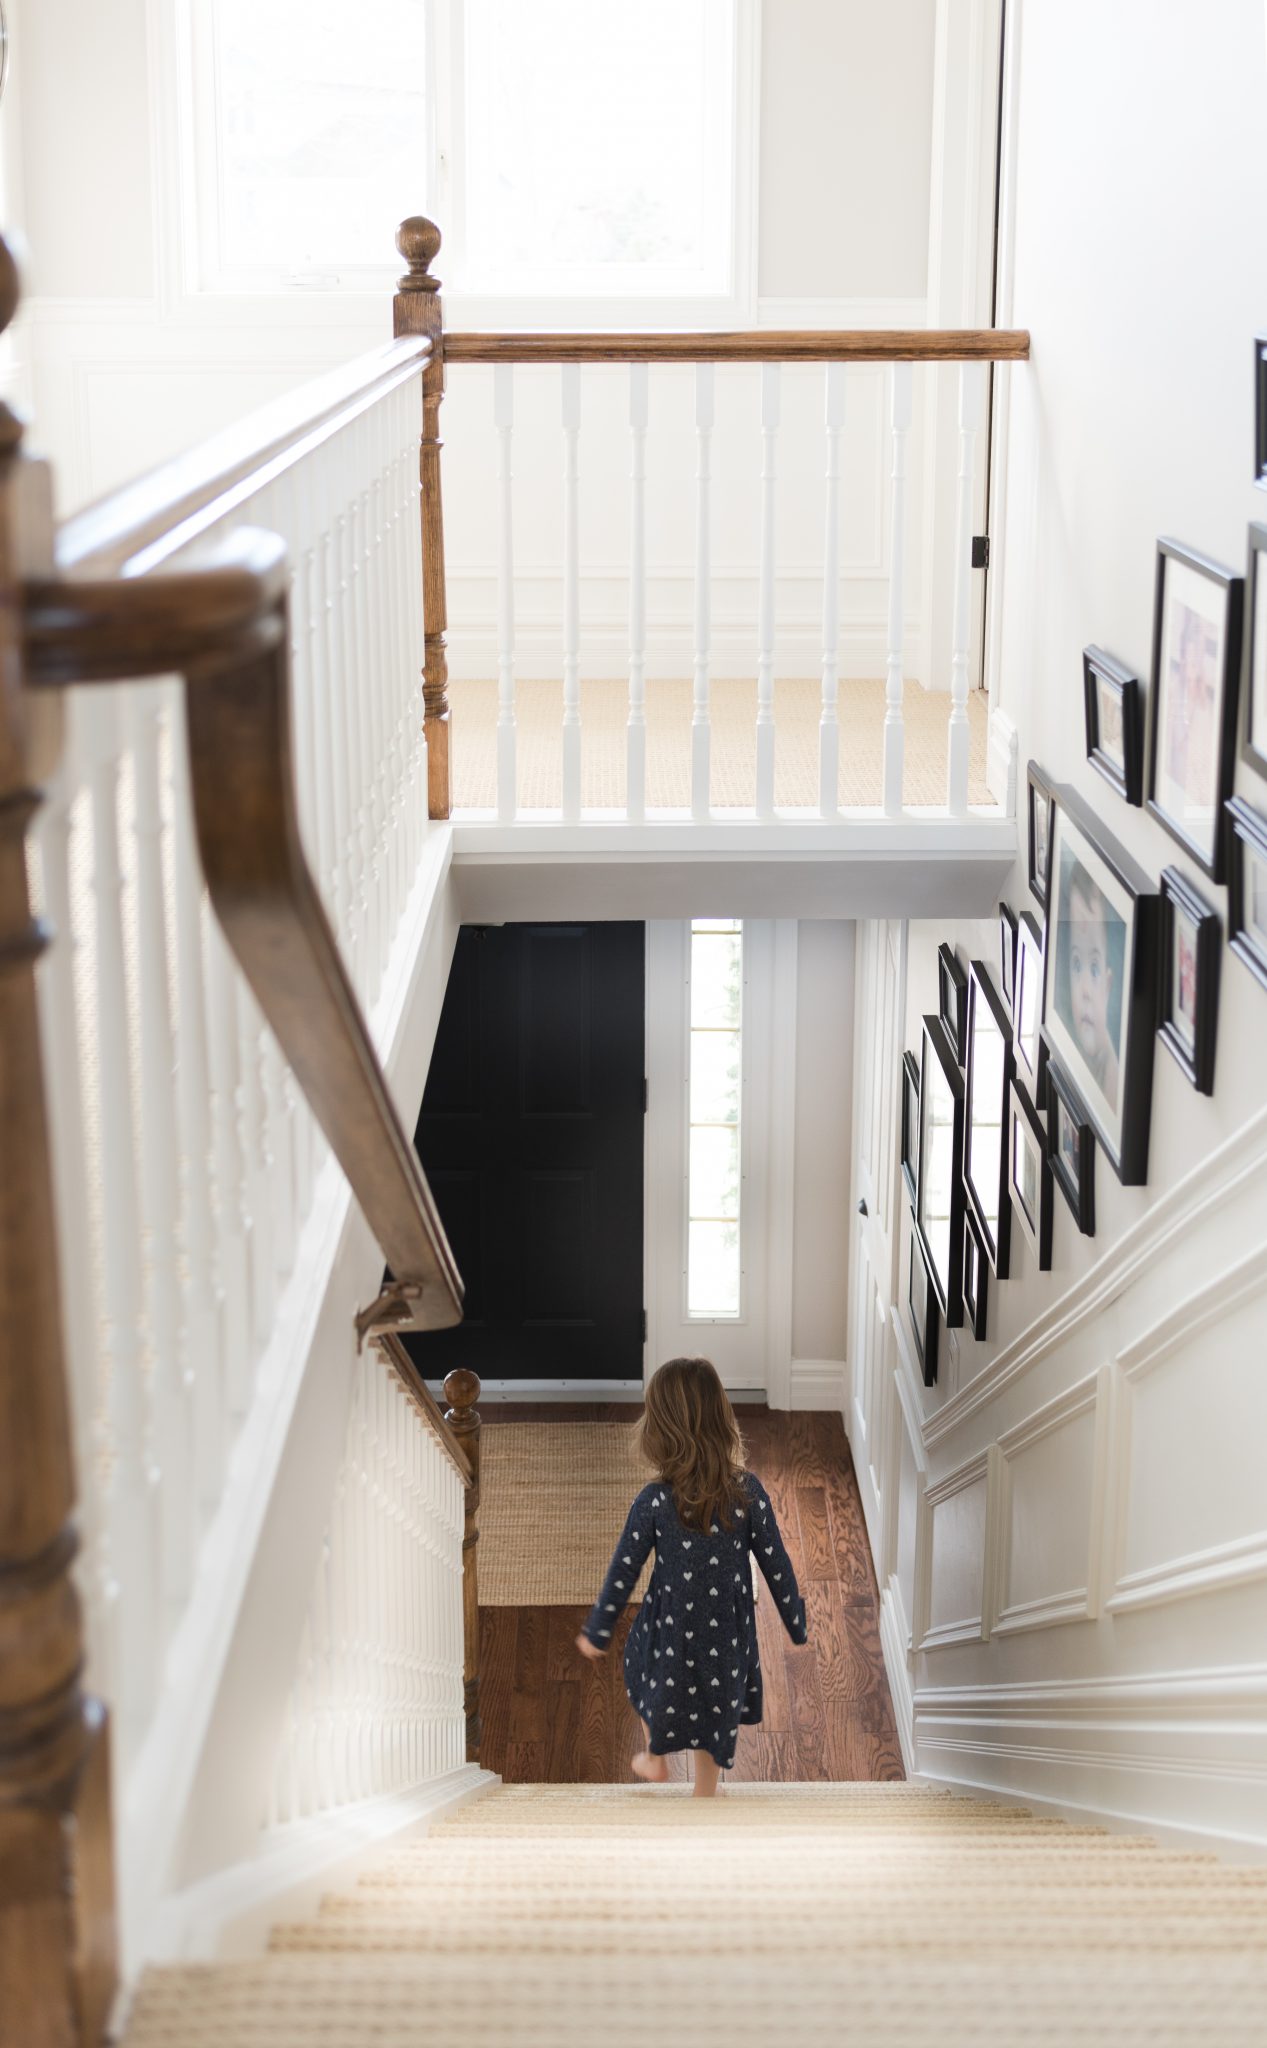
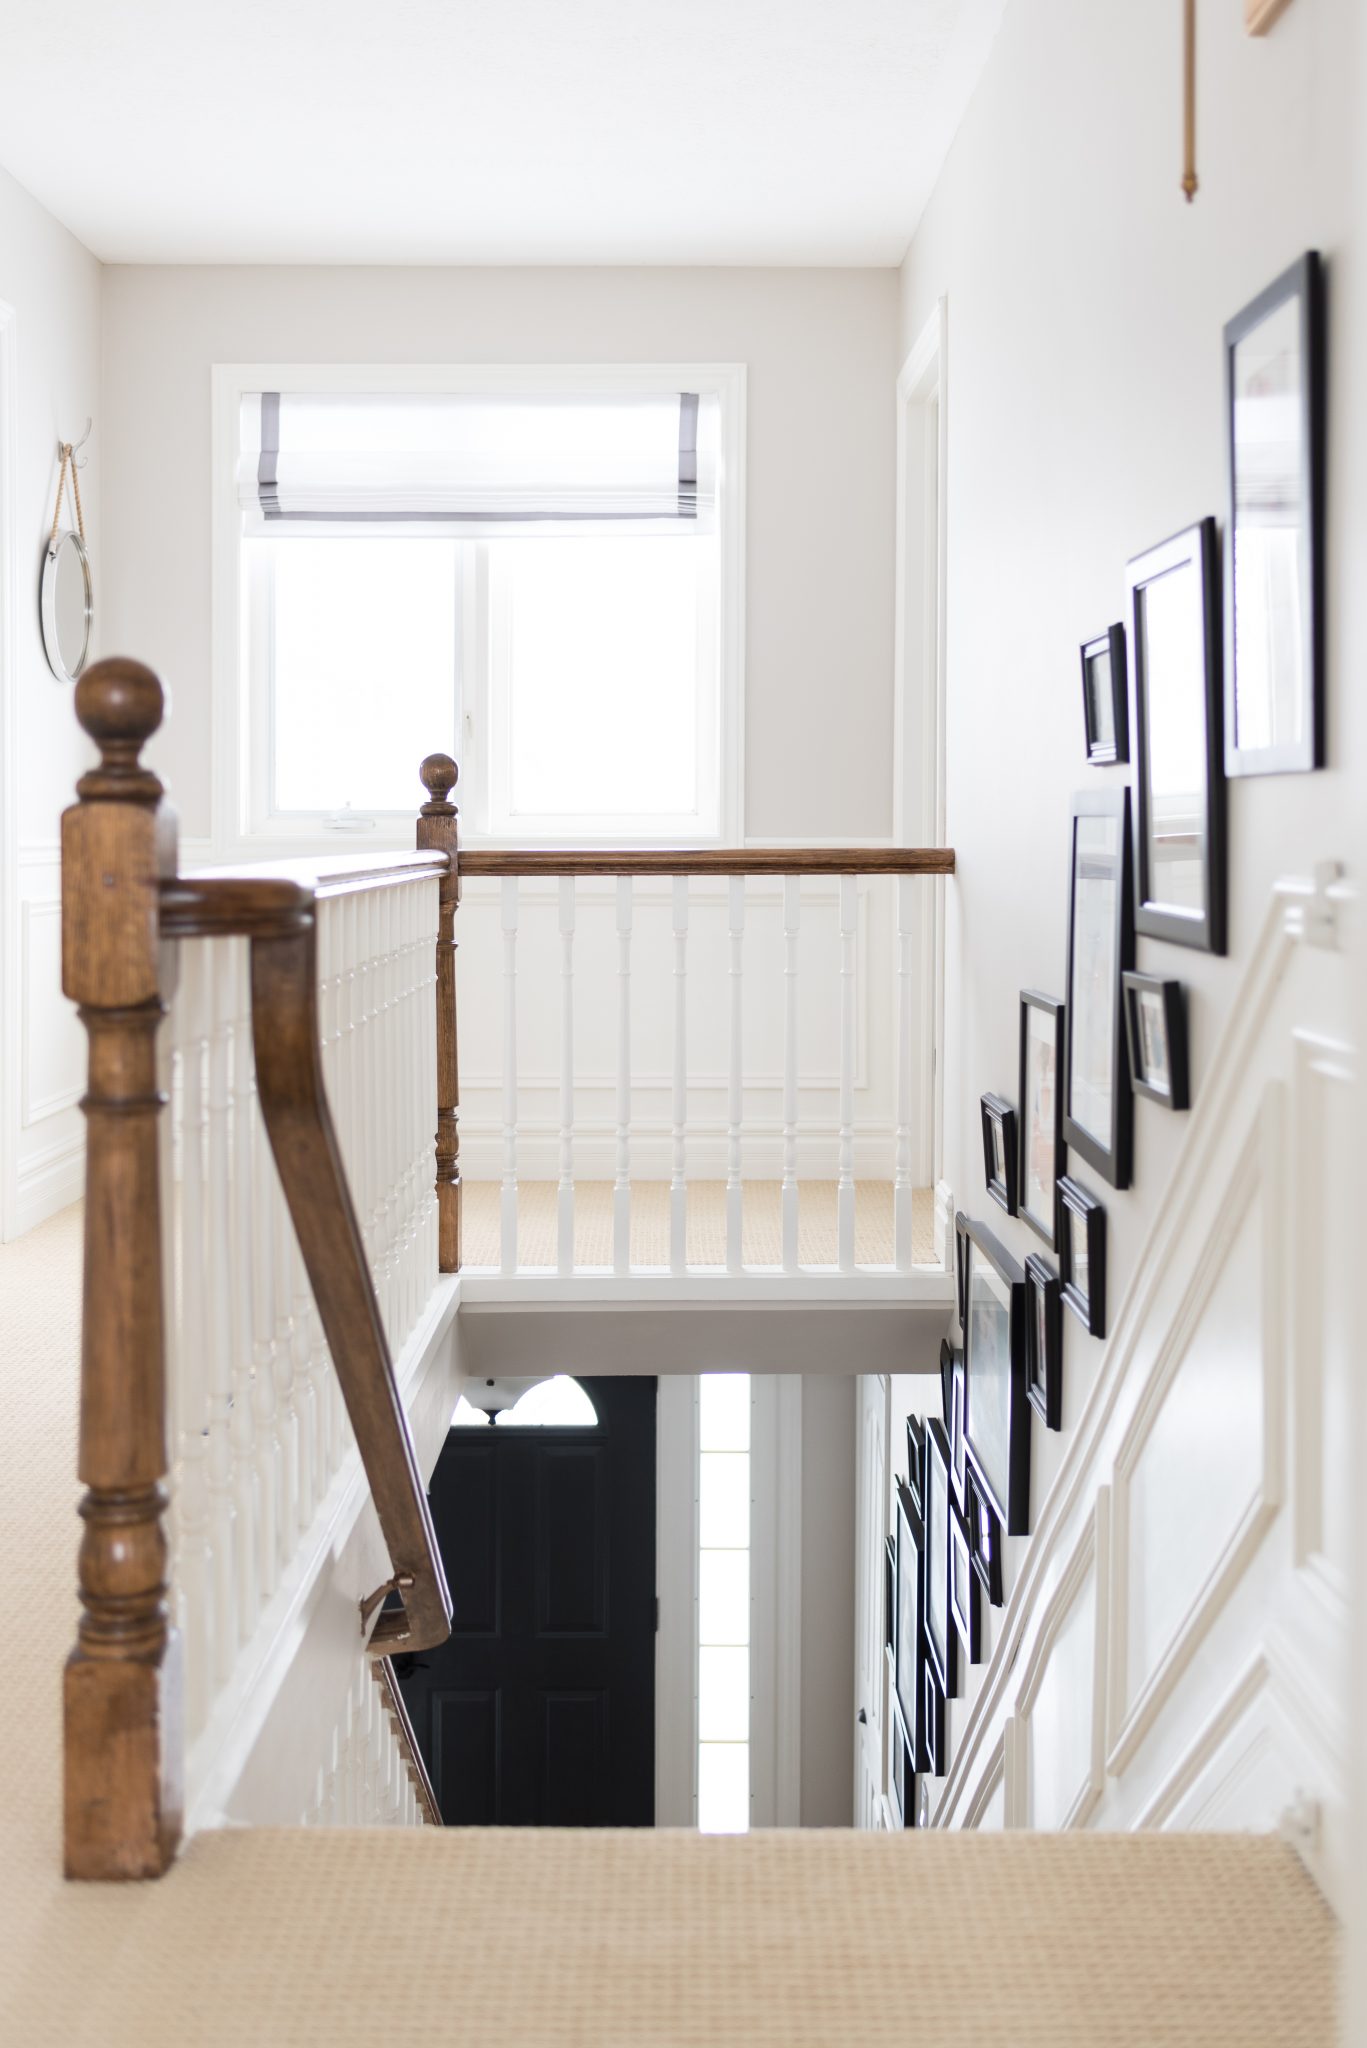
Our gallery wall is one of the first projects we tackled in our house, and it’s still one of my favourites. We used the blank space in our stairwell to create a large collection of our family photos. It’s a big statement that always attracts the attention of our guests, who love to peek at some of our favourite memories and learn the stories behind the photos. 

We also added a layered gallery wall in our living room, but after making a few changes to the space we replaced it with our DIY craftsman style fireplace and hidden TV. 

When it comes to creating a gallery wall, there are a few ideas and steps you can follow to achieve a perfectly curated collection of art. So we thought we’d share our advice…

How to Create A Gallery Wall

Choose Art 

Start by collecting a selection of art for your gallery wall, or maybe you already have a collection tucked away. Deciding what type of art and determining a common theme is the starting point for any gallery wall.

We decided to use our gallery wall as a way to display our favourite family photographs in one dedicated space in our home. But there are so many different types of art you could include, so remember to be creative and think outside of the box. 

  • Family photographs
  • Kids art projects
  • Fine art prints or paintings 
  • Sculptural pieces (baskets, hanging plants, etc.)
  • Heirloom pieces (framed jewellery, menu, material, etc.)  

Choose pieces that bring you joy or remind you of people, places or moments from your past. Your gallery wall should be a reflection of your personality and life. 

Create Consistency With Frames

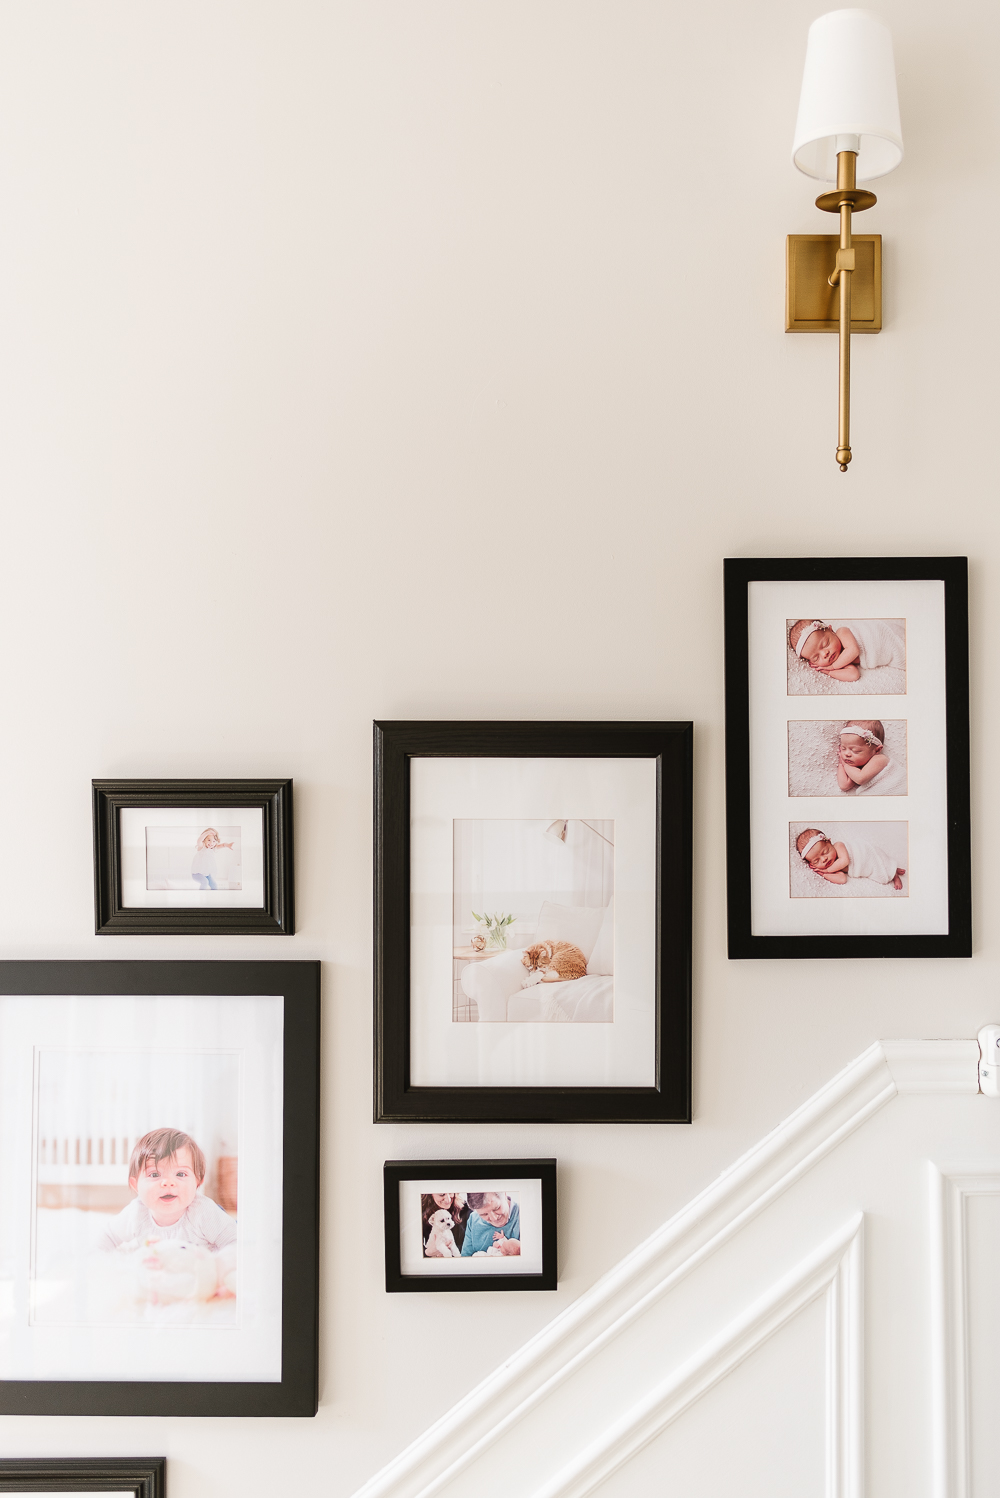
Once you’ve decided on the art you want to display you need to think about frames. Choose frames in a similar colour and finish for a cohesive look, or use a mix of different styles for an eclectic feel. You’ll also want to consider size, using frames of different sizes will create visual interest. One or two large pieces (these can be actual large-scale art pieces or small art pieces that are framed in oversized frames) are needed to anchor the gallery wall. 

We opted to use a collection of black frames to create a feeling of consistency. I also like to use frames with matting or have custom mats made, I find it helps to ground the photos and create a bit of breathing room. 

Plan A Layout

Before you start hanging frames on the wall, you’ll want to play around with the layout to make sure you get it right. If you have space, lay the frames on the floor in front of the wall to get an idea of the arrangement. You can also create templates for each frame by tracing them on kraft paper. Use painter’s tape to attach the templates to the wall and create a layout you’re happy with.

It will take a little bit of finessing to get it just right, so don’t be discouraged. Take your time and create a layout that works with the space, not against it. 

Time To Hang

Now that you’ve created a layout you love, it’s time to pick up that hammer. We suggest starting with the largest piece, that should be near the center and working outwards. Remember to keep about 2 to 3 inches of space between your frames to create visual space, otherwise, your gallery wall will look and feel busy. 

We get a lot of questions about the number and dimensions of frames in our staircase gallery wall, so I included a helpful guide with this information if you’re interested in creating a similar look.

Don’t get too caught up with “the rules”, instead enjoy the process of putting together a collection of photos and art that tell a story. And remember to make changes and additions in the months and years to come to keep your gallery wall feeling fresh. If you’re looking for even more inspiration take a look at our Pinterest board where I’ve pinned some of my favourite artwork and gallery walls.  

YOU MAY ALSO LIKE...

  • Three Easy Ways to Hang Art on Board and Batten
  • A layered gallery wall adds interest and depth to this charming modern farmhouse living room.
    How to Hang a Layered Gallery Wall
  • Create a fresh and youthful bedroom or playroom with this sweet & whimsical art for girls
    Sweet and Whimsical Art for Girls

Comments

  1. Sarika says

    July 13, 2020 at 5:05 pm

    Hi love your page. Can you please tell me if measurements are in cms or inches? Thanks

    Reply
    • Nick says

      July 16, 2020 at 9:00 am

      Hi Sarika, the measurements are in inches!

      Reply
  2. Saraya R. says

    September 25, 2020 at 9:07 pm

    This is awesome! I actually used your layout to plan out our gallery wall. However, I’m having trouble finding frames of these sizes. Where do you find 9.5 x 7 frames? Or are these custom frames?

    Reply
    • Alicia says

      September 29, 2020 at 9:35 am

      Hi Saraya, I’m so glad you found our layout for the gallery wall helpful! The frames are from Ikea, however, we bought them a few years ago so I’m wondering if they are still available. If you can’t find that size, I would just add frames that were close to the dimensions we used. It will still turn out beautifully! 🙂

      Reply
  3. Erin Marie says

    May 30, 2021 at 2:46 pm

    Hi! Did you get all of these frames from Ikea?

    Reply
    • Alicia says

      July 8, 2021 at 10:10 am

      The majority of them came from Ikea, but a few of the small frames we already had on hand.

      Reply

Leave a Reply Cancel reply

Your email address will not be published. Required fields are marked *

A place to find design inspiration, entertaining ideas and simple recipes. Take a few minutes to learn more about us, shop our favourite things and sign up for our weekly newsletter.

JOIN OUR NEWSLETTER

We're welcoming February with a round-up of our fa We're welcoming February with a round-up of our favourite pieces to refresh your home for spring (swipe to see what made the top of our list). We know it's still quite a few weeks away, but that doesn't mean you can't embrace the shifting of seasons a little early. 😉Follow our shop @nick.and.alicia on the @shop.LTK app to shop this post and get our exclusive app-only content! https://liketk.it/3xbcz
Decorating our girls' bedrooms for Christmas is on Decorating our girls' bedrooms for Christmas is one of our favourite holiday traditions. It's always exciting to bring out all of their holiday decor and look through the pieces they may have forgotten about over the year.They look forward to decorating their own miniature trees with the special ornaments they've collected and adding a few festive touches, like this DIY wooden house and bottle brush trees. Swipe through to see all of the details...Follow our shop @nick.and.alicia on the @shop.LTK app to shop this post and get our exclusive app-only content! https://liketk.it/3tYAr
This week we're sharing a glimpse into our home al This week we're sharing a glimpse into our home all dressed up for the season. It feels cozy, inviting, and classic, and we can't wait to share it with you! ⁣ ⁣ Follow our shop @nick.and.alicia on the @shop.LTK app to shop this post and get my exclusive app-only content!⁣ https://liketk.it/3tVpl
We're sharing our favourite holiday wrapping essen We're sharing our favourite holiday wrapping essentials on the blog today. And while I've got everything I need to create beautiful gifts for under the tree, I still need to finish our Christmas shopping. 😳⁣ ⁣ Have you started your holiday shopping yet? ⁣ ⁣ Follow our shop @nick.and.alicia on the @shop.LTK app to shop this post and get our exclusive app-only content!⁣ http://liketk.it/3sWRM⁣ ⁣ #
We decorated our front porch this week just before We decorated our front porch this week just before the first snow of the season. ❄ Cedar and pine garland, a fresh pine wreath, and a prelit faux tree create a simple and festive look to welcome guests into our home this season. ⁣ ⁣ Yesterday we shared our favourite ways to decorate with holiday greenery on our blog, nickandalicia.com. Visit the link in our profile to read the post and follow our shop @nick.and.alicia on the @shop.LTK app to shop this post and get my exclusive app-only content!⁣ ⁣ http://liketk.it/3sFs4
Alright, I know it's early, but it's true...the go Alright, I know it's early, but it's true...the good stuff always sells out so quickly! So today we are sharing the holiday decor essentials we're stocking up on!Tip: Order your greenery now because it's usually the first to go! 🌲Follow our shop @nick.and.alicia on the @shop.LTK app to shop this post and get our exclusive app-only content! #liketkit #LTKGiftGuide #LTKHoliday #LTKhome@shop.ltk http://liketk.it/3pMcr
Am I the only one that feels like our home is neve Am I the only one that feels like our home is never really finished, even after a big renovation? 🙋🏻‍♀️We shared our finished renovation a few months ago but we knew there would still be additions to make in the weeks and months ahead. I've added a few new pieces of decor and we installed a custom roman shade, but the biggest change we made was replacing our kitchen appliances. It's a big investment, but one that is worth it.We partnered with our friends at @frigidairecanada to update our existing appliances and today we are sharing all about it, from why we chose @frigidairecanada appliances again to the favourite features we're swooning over.

Join our Newsletter

Copyright ©2022 Nick + Alicia
  • Contact
  • POLICIES + DISCLOSURE