
This post is sponsored by Kreg Jig
We recently added this beautiful transitional-style sideboard to our dining room, and it’s brought us one step closer to finishing this space. If you missed it, our dining room was listed as one of the projects we hope to complete this year (see all of Our 2023 Projects and Plans). We recently made a few additions to our living room, and because our living and dining room share an open space, we ultimately decided to make a few changes to our dining room as well.
Click the button below to access the transitional dining room sideboard building plans
Lately, I have really been leaning into the idea of adding more layers to our home. I want to incorporate pieces that add texture, warmth, pattern and character to our spaces. I feel like we’ve achieved this in our living room, and now it’s time to bring that same level of character to our dining room.
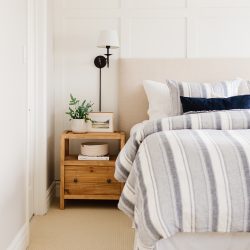
We started with this transitional-style sideboard, as it was really needed. The original sideboard we had in our dining room was built by Nick about six years ago. And while it was beautiful, it was really starting to show some wear and tear, not to mention we were ready for something a little different.
We knew we wanted to add more warmth to our space with a natural wood piece, as well as bring in a bit more of the transitional style we are so drawn to. We also wanted a piece that not only looked beautiful, but that was quality-made and would stand up to life in our busy home.
Together Nick and I designed this piece of furniture based on a mix of high-end designer pieces and vintage finds we love. We took into consideration all of the little details that make designer furniture stand apart from the rest so that we could incorporate these ideas into our own design.
We started with the basic shape and size of the piece. As I’ve mentioned before, our living room and dining room is an open concept space that requires a lot of thought to intentionally fill empty wall space. We knew the piece we were designing and building needed to be rectangular in shape and not very deep.
While we usually use white oak for our furniture, Nick decided to use maple this time. He chose it because it’s strong, fairly resistant to dents and chips, has subdued grain and is easy to work with.
Once we had the basic shape of the piece in mind and the material we were using we started incorporating all of those little details that would keep it from feeling too simple and boring.
Rounded Edges
This might be my favourite detail. Nick used a router to create rounded edges on both the front sides of the sideboard as well as the top. It’s such a little detail, but it makes a really big impact. It softens the entire look of the piece and gives it a much higher-end look.
Inset Base
From the very initial design phase, we bounced back and forth about the base of the sideboard. We were unsure whether or not to extend it to the floor or keep it feeling light by adding feet or legs. I loved the idea of the piece not feeling quite as heavy as our last one, but I also knew adding legs would mean less storage space, not to mention lots of lost toys and dust bunnies hiding beneath.
We settled on an inset base for the sideboard which I love! It almost makes it look as if it’s floating, but still provides so much cupboard space for storage. This little detail gives a more modern take to a traditional piece.
Inset Doors and Drawers
Another way we designed this piece to feel more high-end was to incorporate inset doors and drawers. Inset cabinetry tends to be more expensive because it requires the doors and drawers to be carefully crafted to fit precisely within the cabinet frame.
It also creates a really clean and streamlined look, which helps it feel more modern and fresh.
The Finish
Choosing the stain colour for the finished sideboard was by far the most difficult aspect of the entire project. I had a vision of the exact tone of wood I wanted for the piece but finding a stain to match proved very difficult.
I wanted a really warm neutral, that didn’t read too grey or too yellow, but it was almost impossible to find. We actually even considered going darker and staining it closer to the colour of our coffee table, because we just couldn’t find the right shade. We persisted though and I am so glad we did, because we eventually came across this stain in a custom colour called Explorer, and it was perfect!
It is a water-based stain, which was different from the oil-based stains we were familiar with, but it was easy to use and has definitely become a favourite of ours as it can be tinted in over 60 different colours. It’s so nice to have a bit more variety now when it comes to stain colour choices.
We sealed it using this product, for a nice matte finish.
Hardware
The second hardest decision we made was hardware. We wanted to choose hardware that felt special and added interest to this beautiful piece of furniture. We searched high and low and finally settled on recessed pulls for the drawers and rounded knobs for the doors.
The recessed pulls are in this beautiful oval shape with a line detail that I just can’t get over. They are so unique and feel like they were made just for this sideboard. We chose to use the antique brass finish to add warmth and create a feeling of cohesion with the other finishes throughout our home.
The rounded knobs are another favourite of mine. They feel like the perfect mix of traditional and modern and they match perfectly with the recessed pulls we chose. Again, we opted to use the antique brass finish.
Considering all of the details that went into this piece, it is definitely an advanced build. Nick did an incredible job of incorporating all of the ideas I had for this piece, and I think it’s the perfect addition to any dining room. Now, I am really looking forward to making a few more changes to our dining room with a new table and chairs, maybe even a rug!
Click the button below to access the transitional dining room sideboard building plans


Ben says
Great job on the design and build!
Alicia says
Thank you so much, Ben! We are really happy with this one! 🙂
Dianne says
Absolutely beautiful 😍
Alicia says
Thank you, Dianne, we are so happy with how this turned out, and I think it looks perfect in our dining room! 😉
Christie says
You are so blessed to have a husband that can do that. And I just love this piece. Quality is key. I have paid some money for that but feel I don’t want cheap and have to keep buying because cheap don’t last. Have a Jesus filled day!
Alicia says
Thank you, Christie! We feel very lucky that Nick has this amazing skill, and is able to build us pieces that not only look beautiful but are of high quality. You’re right, quality is so important, especially in the long run. That is why we always push the importance of buying quality pieces in classic designs. Thank you again for your kind comment! 🙂
Thomas says
Was the top made pit of a solid piece of maple or was it plywood or several boards joined? Thanks! It’s a beautiful piece!
Alicia says
Hi Thomas,
In this case, it was several boards joined together, but you could use 3/4 inch plywood with edge banding. I hope this helps, any other questions just let us know!
Mireille says
I love this!! Would you be able to share what finish you used and the process you used? TIA!
Nick says
Hi Mireille,
We used a Behr water based stain and finished it with a dead flat varnish by Saman. Any water based stain and flat varnish would give you the same type of effect! The key part is finding a flat or matte varnish!